When it comes to network traffic monitoring, a single and unified view of your networking infrastructure is essential in ensuring that your environment is correctly watched over. It’s common to have hundreds, if not thousands, of routing and optimizing devices in today’s global networks. This tends to make monitoring things like traffic load, application usage, host usage, and more a mission-critical feature.
The value of customizing dashboards for specific use scenarios becomes clearer when you start to think about collaboration. Scrutinizer stores granular metadata. It’s a record of every conversation and in many cases, much more. Providing this easily digestible and shareable data via a dashboard that is tailored to the needs of a specific department has become one of the reasons why companies have chosen Scrutinizer.
This is why I wanted to dive into Scrutinizer dashboard engine. In this multi-part series we will explore how to work with our dynamic dashboard engine and how it helps companies tailor their users’ experience to the needs of multiple departments. Specifically, I’m going to talk about the network management’s and security team’s dashboard views.
For the first installment of this series we will learn how to set up and manage dashboards in Scrutinizer.
Dashboards are unique to each user or group
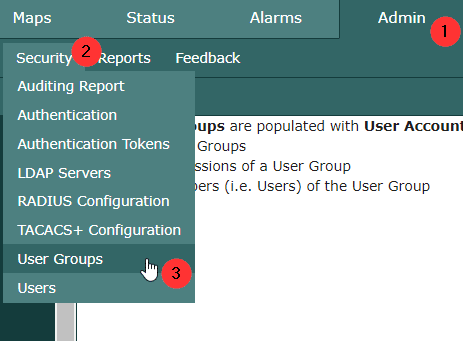
First, we need to understand that dashboards can be unique to a user or group. To manage a group’s settings, just click on the Admin Tab (1), then the Security sub-tab (2), and then click on the User Groups option (3).
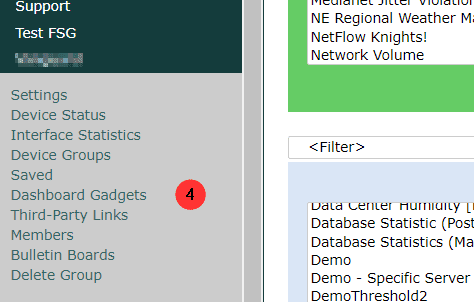
Here you can determine which dashboard gadgets are available to this group (4).
Managing Dashboards
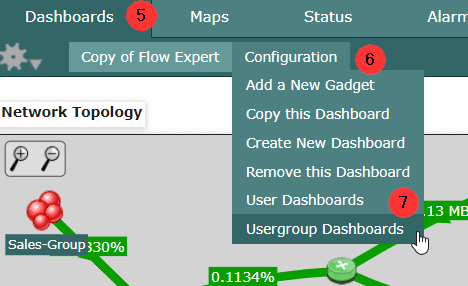
Now that we have defined what that group can see, we can start to manage the users or user group’s dashboard experience. To get to the manager, click on the Dashboards Tab (5) and then click on the Configuration sub-tab (6). Here you can manage User Dashboards or Usergroup Dashboards (7). Both links will open the management modal to the correct sub-tab.
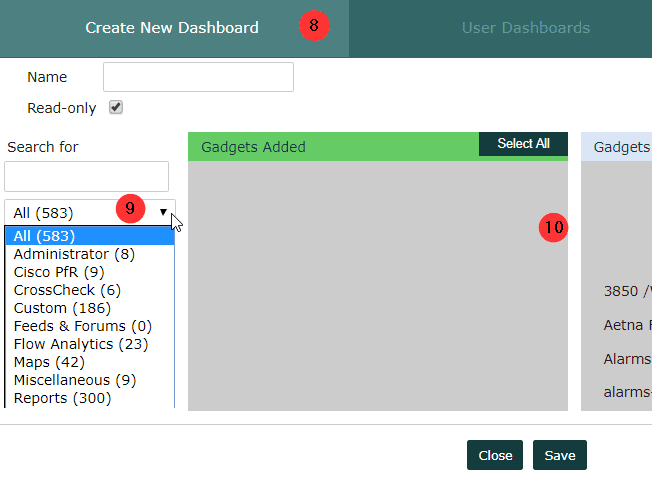
In the management modal, the first option is to Create New Dashboard (8). This option allows you to create a new dashboard under your account. Once you create the new dashboard, it will appear under the Dashboards drop-down menu. When creating a new dashboard, you can use another dashboard as a template (9). Lastly, you can add any of your available gadgets to this new dashboard (10).
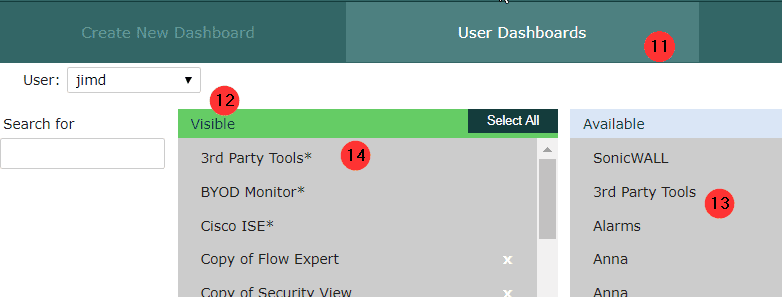
Under the User Dashboards sub-tab (11) you will see the available dashboards for that user. These are either pre-created or custom dashboards that the user has permission to use (12). You can add (13) any of these dashboards to the user’s profile, making them visible (14).
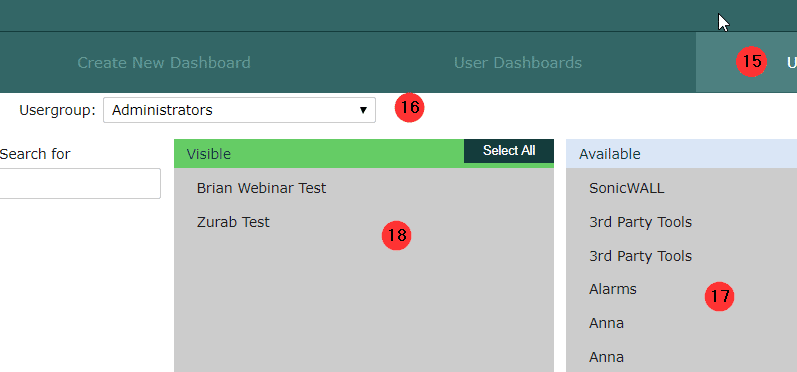
The Usergroup Dashboard tab (15) is where a group gains permission to view a dashboard. In this case you would select one of the usergroups that you pre-defined (16), choose from the available dashboards (17), and then drag them to be assigned to this group. Now any user who is part of that group will be able to see the dashboards that you have assigned to them
Now that we have gone over the basic construction of users and usergroups dashboards we can start to explore their use and value. In the next session we will start to build a dashboard that is network management centric. We will talk about some of the provided gadgets and how you can create your own with the reporting engine.
Stay tuned!