
So you have added storage to your fresh Scrutinizer deployment. Or you’re giving your existing Scrutinizer deployment extra space. If you add a second disk, this is a straightforward process. Our awesome developers have come up with an easy way for expanding Scrutinizer’s disk.
Scrut_util.exe
Set partitions /dev/(disk)
Example:
Set partitions /dev/sdb
This will automatically go through everything for you.
But what if you were to expand your existing disk? This is a little more involved. If you would like help, there is a link at the bottom of this blog that will take you to our Support page. Feel free to open a ticket. Now let’s begin…
To get started, verify that the disk space is there.
fdisk –l
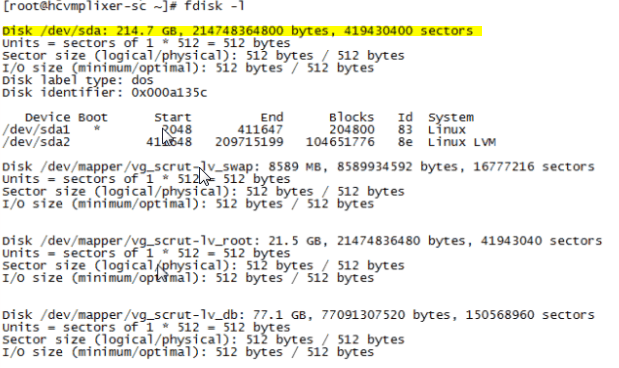
We will need to add a third partition. For this, we’ll use GNU Parted.
Partitioning
To start, run Parted.
parted /dev/sdb
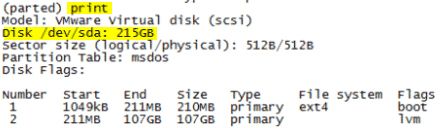
To print the existing partitions, enter print.
Now make a new partition. To do this, enter:
mkpart
This will run through a wizard. It will ask you 4 things.
- Partition type? (Primary partition)
- File system type? (ext4)
- Start? In this case you would enter 108gb, but if you are adding another partition again, look at your fdisk –l and see where the previous partition ends.
- End? -0 will use all available space.

Once done, type print again.
If everything looks good, type quit and then reboot Scrutinizer.
shutdown –r now
Expand the volume group
Once you reboot, add the new partition to the volume group using vgextend.
vgextend vg_scrut /dev/sda3
You can use vgs to show the volume group.
vgs vg_scrut

Now we can see that we have 99.42GB free to apply to the database volume. All but .01 can be used. To apply this:
lvextend –-size +99.41g /dev/mapper/vg_scrut-lv_db
And to check to see if it worked:
lvdisplay /dev/mapper/vg_scrut-lv_db
Home stretch!
Now that we have applied the additional storage to the database, we need to unmount, check the disk for errors, then resize the file system.
Let’s start by stopping all running services.
scrut_util.exe
services all stop
Next, what I like to do is run a df –h and unmount these paths.
unmount /var/db/fast/scrut_tmp/collector
unmount /var/db/fast/pg_stat_tmp
unmount /dev/mapper/vg_scrut-lv_db

Then we need to check the disk for errors. We use fsck to check the disk integrity.
fsck –f /dev/mapper/vg_scrut-lv_db
Just one last thing… we need to resize now using resize2fs.
resize2fs /dev/mapper/vg_scrut-lv_db
That’s it!
Remount and start all the services.
mount –a
scrut_util.exe
services all start
If you’re still reading this, it means one of two things. Either you were able to add more storage on your own, or you came across a hiccup. If you came across a hiccup, please open a support ticket to reach out to myself and the rest of the support team.