These days, wireless networks support a mixed use of employees, guests, and vendors. Without adequate classification and prioritization of applications, companies risk reduced employee productivity and a longer response time to the critical applications that they use. As the need for wireless network monitoring on both traffic management and security levels increases, more and more vendors introduce NetFlow and IPFIX support. In this blog, we will go over configuring the recently added Aruba IPFIX Support both in the WebUI and in CLI.
Aruba Network Monitoring is Straight Ahead
Founded in 2002, Aruba Networks has been focused on bringing wireless LAN mobility solutions to enterprise networks. In 2015, it was acquired by Hewlett Packard Enterprise and became known as Aruba, a Hewlett Packard Enterprise Company. Its core products are wireless Access Points (APs), wired switches, mobility controllers, and network management software.

These days, Aruba delivers IT solutions that empower organizations to serve GenMobile – mobile-savvy users who rely on cloud-based business apps for every aspect of their professional and personal lives. With infrastructure services offered as software from the public or private cloud, Aruba provides secure connectivity for mobile and IoT.
As my colleague Scott explains in his blog, there are multiple benefits of wireless network monitoring using NetFlow. No wonder that after numerous customer requests dating back to 2012, Aruba IPFIX support is now available.
How to Configure Aruba IPFIX Support in the WebUI
Before enabling IPFIX, the device must be configured for local management within the node. As we found out, the IPFIX tab will not display in the WebUI if the device is not locally managed.
Step 1: Enable IPFIX
- In a Managed Device node hierarchy, navigate to Configuration > Services and select the External Services tab.
- Click on IPFIXaccordion. Select Enabled from the Enable IPFIX drop-down list.
Step 2: Configure Wireless Export
Great news everyone: starting with ArubaOS 8.0.1.0, IPFIX supports wireless export. With wireless export enabled, data flows become unidirectional. You can define a new template to gather and export information about wireless clients, in addition to the standard attributes exported through the existing, pre-defined template. The wireless attributes include Station MAC, Station IP, Station SSID as well as AP MAC.
Step 3: Assign the Collector Device
The Collector device receives, logs, and stores the data from the other devices in the node.
- Enter the IP address of the device in the Collector IP address field.
Step 4: Select a Transfer Mode
- Select a UDP transfer protocol from the Transport mode drop-down list.
Step 5: Assign a Destination Port
- Enter the port number into the Port 4739 is the default port to listen on for IPFIX.
Step 6: Configure the Flow Cache Size and Interval Settings
The Flow Cache limits when the cache is exported to the Collector device and can be determined by the size of the cache or the duration of time in the session. When any one of these values is met, the cache is exported and a new one begins.
- Enter 1000 for the maximum number of entries in the Flow cache size field.
- Enter 60 for the time interval for an active session in the Upload interval (all) field.
- Enter 15 for the time interval for an inactive session in the Upload interval (inactive) field.
- Enter 60 for the time interval to export templates in the Upload interval template field.
Step 7: Select the Observation Domain
The Observation Domain is a value used by the Collector device to group devices when receiving data sessions.
- Enter the value in the Observation Domain
- Click Submit, then Pending Changes. In the Pending Changes window, select the checkbox and click Deploy changes.
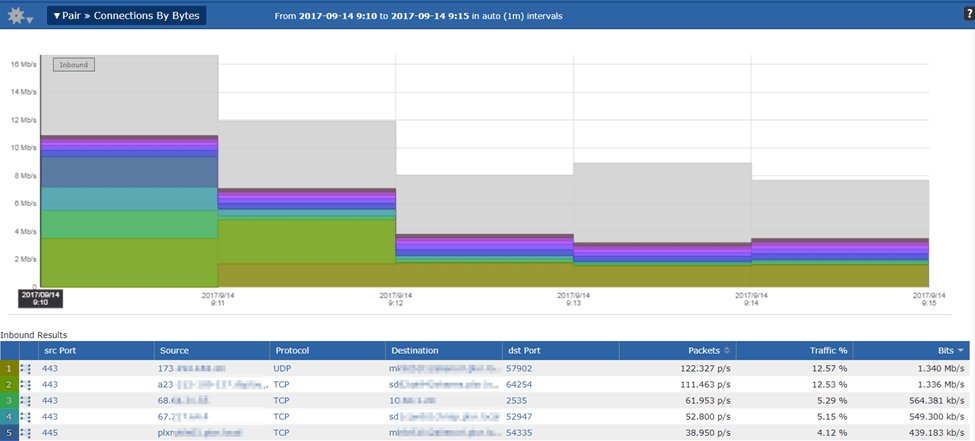
And voila, a few minutes later we are ready to drill into the Aruba exports:
How to Configure Aruba IPFIX Support in the CLI
(host) [md] (config)#ip-flow-export-profile
(host) [md] (ip flow collector profile)#enable
(host) [md] (ip flow collector profile) #wireless-export
(host) [md] (ip flow collector profile)#collector-ip <collector ip address>
(host) [md] (ip flow collector profile)# transport-protocol<protocol>
(host) [md] (ip flow collector profile)#port <port number>
(host) [md](ip flow collector profile)#flow-cache-size 1000
(host) [md](ip flow collector profile)#upload-all-interval 60
(host) [md](ip flow collector profile)#upload-inactive-interval 15
(host) [md](ip flow collector profile)#upload-template-interval 60
(host) [md] (ip flow collector profile)#observation-domain
If you had the flows, you’d know what happened
Is a guest downloading movies stealing valuable bandwidth away from the mission-critical applications? Who are your top users? Do you even know what applications are running on the wireless network? If you would like to get the answers to these and many other questions reach out to the support team for assistance with device configurations.