Estimates show that 1 in 4 organizations will experience data loss of more than ten thousand records within the next twenty-four months. Without the right tools, data breaches and data thefts are unbelievably difficult to catch.
One of the many benefits of NetFlow is that you have quick access to the most valuable information on your network. You can get details on the source and destination IPs, countries, ports used, and application details, which gives you a good representation of what is taking place on your network. By leveraging this information, you can quickly identify problems as well as determine root-cause without needing full packet capture to understand what is taking place.

What is a data breach?
A data breach, also known as data exfiltration, is the unauthorized transfer of data. In most cases, bad actors use social engineering and phishing attacks to trick employees into giving up valid user credentials. The malicious actor’s primary intent is to find and copy specific data from a specific machine. The hacker gains access to the machine through a remote application or by directly installing a portable media device. These targeted breaches often occur on systems that still use the vendor’s default password or an easy-to-guess password. The hackers use those credentials to gain a foothold in the company. Then they move laterally across the organization, looking for data worth stealing. If successful, they start moving that information outside in a low and slow fashion to avoid detection. Unless companies are leveraging network traffic analytics, this data breach often goes unnoticed.
How can I use NetFlow to monitor for targeted data breaches?
Last week we received a call from a customer who was having a very bad day. Matt’s security team informed him that an internal IP address had failed to log on to accounting servers. “Often times these investigations lead to nothing, but we follow up on every one of these reports to try and ensure that nothing’s been compromised,” said Matt. “After a quick search in Scrutinizer with a few filters, I uncovered an odd pattern that I hadn’t seen before. The internal IP in question was trying to access the accounting servers and company’s databases.” Matt also noticed that the host had been communicating with other machines internally over port 443—that was not typical for the end system behind the IP address. More specifically, he identified a periodic upload of data to an external IP address. That was a legitimate cause for concern.
Once the situation got under control and the compromised machine quarantined, Matt asked us if we could set up proactive monitoring and alerting on the company’s critical assets. The answer was yes, of course.
Define your infrastructure with IP Groups
Scrutinizer can set custom groups of IP addresses for fast queries and much-needed context. For example, you could check for traffic by custom-defined departments, locations, or resource groups.
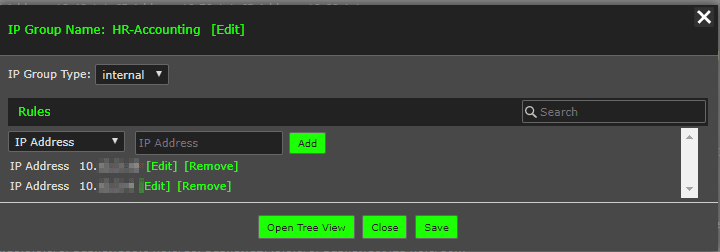
Under the Admin>Definitions>IP Groups page, we can name the IP group and add the IP addresses, subnets or ranges we are looking to group. In Matt’s case, it was the HR-Accounting servers:

Use filters to exclude the allowed traffic
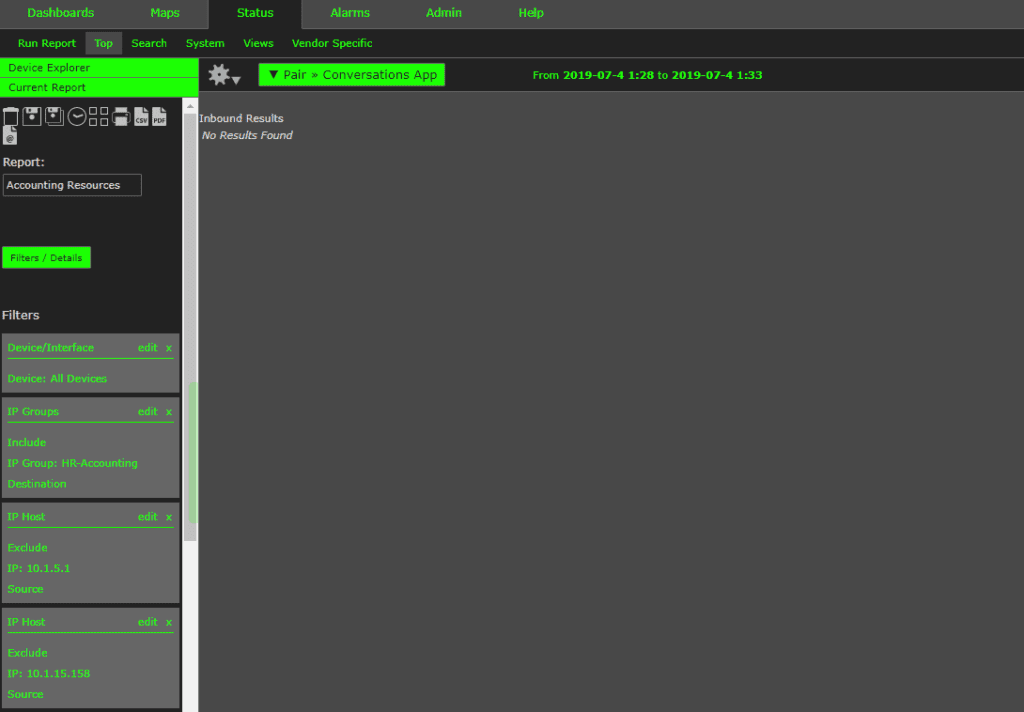
After creating IP groups, we can add filters to our reports for faster report building. Matt and I went to Filters/Details and added the HR-Accounting IP group from the drop-down menu. We also added the filters to exclude the source hosts who were authorized to communicate with the defined group so that Scrutinizer will report the suspicious traffic only.

Setting up thresholds and email alerts
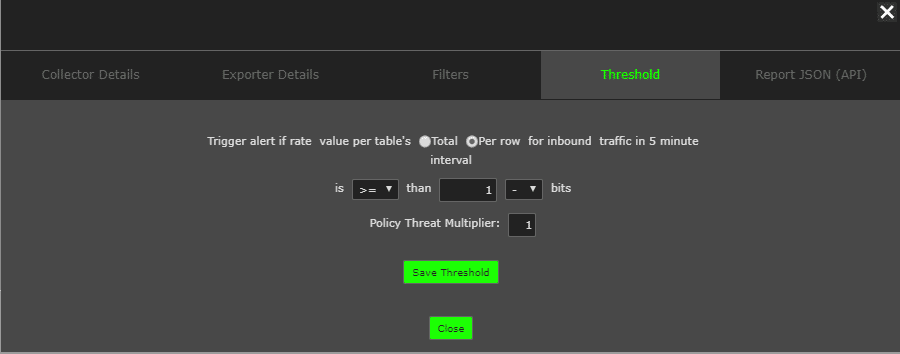
Our next step was to create an alert so that Matt would get an automated email if that report value is met or exceeded. Once we saved the custom report, we set up a threshold by clicking the Filters/Details button and then navigating to the Threshold tab. From here, we can set the value and whether the threshold is for a single communication. Now Matt will get an email sent if a single IP address exceeds 1 bit per second so that he’ll be alerted if an unauthorized host is attempting to access the resource.

We also created a couple of reports to monitor his network for lateral movement as well as the traffic volume going to the external destinations, but that is a story for yet another day. If you need help with catching and investigating targeted data breaches, contact our support team. We are here to help.


