Over the past few weeks I have taken a number of support calls from customers who were looking for some assistance with their Cisco ASA NetFlow configuration using ASDM. So I figured that I would take this opportunity to write a blog walking through the configuration steps to supplement the existing blogs that show a video or have a series of images.
In my opinion, the easiest way to get NSEL exporting from these security appliances is through the use of the ASDM interface. This simple, GUI-based firewall management tool allows you to quickly configure the Cisco ASA without having to use the cumbersome command-line interface. Although I must admit that configuring the Cisco ASA using the CLI is really not that much different that configuring NetFlow on any other router or switch.
So let’s walk through the steps to Enable NetFlow using ASDM
To enable NetFlow, perform the following steps after logging into ASDM:
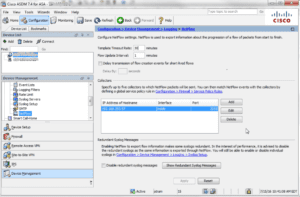
- Choose Configuration > Device Management > Logging > NetFlow.
- Enter the Template Timeout Rate, which is the interval (in minutes) at which template records are sent to all configured collectors. We recommend 1 minute.
- Enter the Flow Update Interval, which specifies the time interval between flow-update events in minutes. Valid values are from 1 – 60 minutes. The default value is 1 minute. This option is available in 8.4.5, and the newer 9.x releases.
- Check the Delay transmission of flow creation events for short-lived flows check box.
- Then enter the number of seconds (usually 15) in the Delay By field to delay the export of flow-creation events and process a single flow-teardown event instead of a flow-creation event and a flow-teardown event.
If this is not configured, there is no delay, and the flow-create event is exported as soon as the flow is created. I have found that if this is not set, we don’t receive an extended teardown event, and the teardown records don’t contain the username elements. If the flow is torn down before the configured delay, the flow-create event is not sent; an extended flow teardown event is sent instead.
- Specify the collector(s) to which NetFlow packets will be sent. You can configure a maximum of five collectors.
- Click Add to display the Add NetFlow Collector dialog box to configure a collector, and perform the following steps:
- Choose the interface to which NetFlow packets will be sent from the drop-down list.
- Enter the IP address or hostname and the UDP port number in the associated fields.
- Click OK
- When NetFlow is enabled, certain syslog messages become redundant. To maintain system performance, we recommend that you disable all redundant syslog messages, because the same information is exported through NetFlow. Check the Disable redundant syslog messages check box to disable all redundant syslog messages.
Now specify what traffic is monitored and what NetFlow Events get sent to the Configured Collector
To match NetFlow events with any configured collector, perform the following steps:
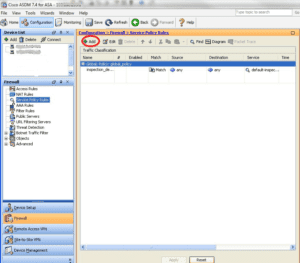
Step 1 – Choose Configuration > Firewall > Service Policy Rules
Step 2 – To add a service policy rule, perform the following steps:
- Highlight the Global Policy as shown above, and click Add to display the Add Service Policy Rule Wizard .
- Click the Global check box – applies to all interfaces radio button to apply the rule to the global policy. Click Next
- Check the Any traffic check box as traffic match criteria, Click Next to continue to the Rule Actions screen.
- Click the NetFlow tab in the Rule Actions screen.
- Click Add to display the Add Flow Event dialog box and specify flow events, then perform the following steps:
- Choose the flow event type from the drop-down list. Select All.
- Choose collectors to which you want events sent by checking the corresponding check boxes in the Send column.
- Click OK to close the Add Flow Event dialog box and return to the NetFlow tab.
- Click Finish to exit the wizard.
So why is the Cisco ASA firewall such a great device for NetFlow visibility?
Cisco ASA NetFlow Reporting gives you direct visibility into:
- General TopN reporting (Applications, Talkers, and Conversations)
- Top usernames or applications (based on port only) being denied network connections
- The events and access rules (ACL) being violated the most and by whom
- The usernames of the IP addresses passing through the firewall
- NAT (Network Address Translations) who is translated to what?
- We also have a direct integration to Cisco ASA FirePower reporting.
Today, monitoring communication behaviors, maintaining baselines, and threat detection with NetFlow is becoming more relevant. When security professionals need to go back in time and view a communication pattern, they can find the flows that contain the conversations that they want to investigate. We have been the industry leader when it comes to NetFlow reporting from switches and routers, as well as security events exported from the Cisco ASA’s.
Do you know what conversations are coming in and going out of your network? Gain insight into your network traffic by using NetFlow exported from your Cisco ASA that is invaluable for application and user security monitoring.


