MikroTik NetFlow support and configuration is a two-step process that can be achieved in a Command Line Interface (CLI) or a Graphical User Interface (GUI). NetFlow reporting is available on all their devices running MikroTik RouterOS v2.9, v3, v4 or higher. The MikroTik NetFlow configuration guide that follows was configured using RouterOS version 6.11. Let’s jump into the configuration!

MikroTik NetFlow Support
The first half of configuring the MikroTik Router is enabling NetFlow and determining which interfaces you want to collect flow from. In the below example, all interfaces are monitored. The second half of the configuration specifies the collector and what NetFlow version to send to the collector. Let us first begin with the Command Line Interface (CLI)\Terminal configuration:
Command Line Interface Part 1:
/ip traffic-flow
set enabled=yes;
set interfaces all;
set cache-entries 1k;
set active-flow-timeout 1m;
set inactive-flow-timeout 15s;
print
The print function will ensure that the configuration was set and should look following after the above commands:
[admin@MikroTik] ip traffic-flow> print
enabled: yes
interfaces: all
cache-entries: 1k
active-flow-timeout: 1m
inactive-flow-timeout: 15s
[admin@MikroTik] ip traffic-flow>
Command Line Interface Part 2:
/ip traffic-flow target
add x.x.x.x:2055 disabled=no version=9;
print

[admin@MikroTik] ip traffic-flow target> print
Flags: X - disabled
#   ADDRESS               VERSION
0   192.168.0.2:2055      9
[admin@MikroTik] ip traffic-flow target>
This will list all the collectors that have NetFlow being sent to them.
You could also specify the version 9 refresh and timeout templates. The template-refresh is the number of packets before the template is sent to the receiving host again. The number of packets is defined as an integer value, which by default is 20. The template-timeout is how often the template will be sent, in minutes, if the max amount of packets has not been reached. Typically this is set to 5 minutes.
set v9-template-refresh 5m;
set v9-template-timeout 20;
Graphical User Interface Part 1:
Now let us configure in the GUI. First, navigate the menus/submenus to the correct category as follows – Main Menu>IP>Traffic Flow:
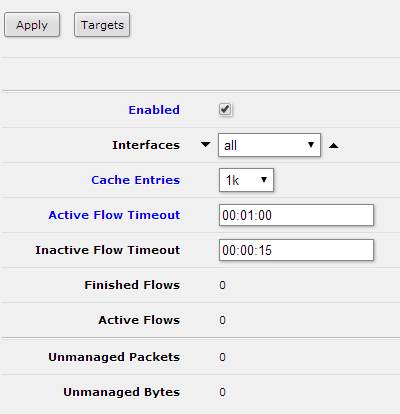
Similar to what was done in the CLI, enable NetFlow and fill in the fields for the interfaces to be monitored, cache entries (the number of flows in the router’s memory at one time), active flow timeout, and inactive timeout.
Graphical User Interface Part 2:
When these settings are saved, press the target option. The following menu will become available:
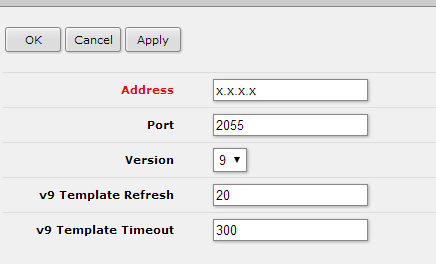
After you have configured the settings in the above screen capture, press Apply. The created collector will now show in the target list; ensure that it is enabled. Once setup is complete, NetFlow reports will be available in the collector.
MikroTik Netflow Monitoring
Looking for more MikroTik NetFlow support or how to configure other network devices for NetFlow reporting and network visibility? Please comment below if you have any questions or came across any issues configuring your MikroTik Router, or reach out to our support line at 207-324-8805.