Modern networks are designed to provide fast and reliable access to the applications that make us productive. Maybe it’s the inventory system used to keep procurement and warehousing in sync, or maybe it’s a system that queues and processes financial transactions. In any case, often these business-critical apps will need to be scaled horizontally to allow for additional concurrent capacity. Orchestrating access to multiple nodes serving the same app can be a technical challenge.
Load balancing products like the F5 Big-IP platform solve this issue by organizing resources into pools, then dynamically routing requests to pool members. One challenge when load balancing traffic is gaining visibility into which hosts were sent to which application node. In addition to load balancing, this tool can be used in a forward proxy chain, allowing for visibility into otherwise encrypted connections.
By using F5’s ability to export messages as IPFIX, we can both gain visibility into how our application demand is distributed and use the unique ability to see within encrypted traffic flows.
The following instruction provides a high-level overview of how IPFIX can be collected from an F5 Big-IP LTM appliance. This is meant to demonstrate what is possible; production configurations should be first reviewed with an F5 SME. Improperly implemented iRules can cause issues with traffic flow.

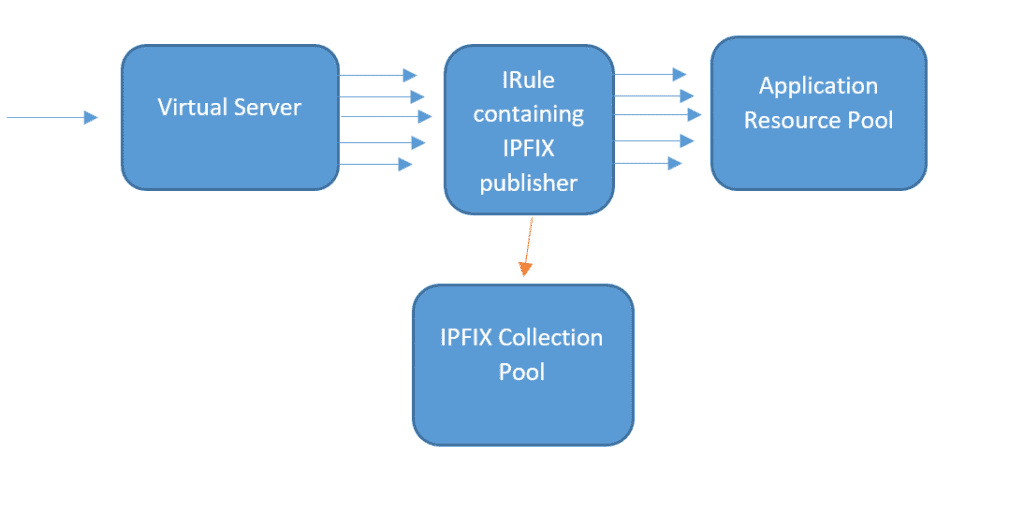
The flow chart above describes where in the process we’ll collect flow data. Network requests are sent to the virtual server IP. The virtual server then distributes the request among an application resource pool. We then use iRules to hook in and collect information for IPFIX messages to export.
The first step is to configure the Big-IP IPFIX collector pool to define where IPFIX should be sent. Here are the steps:
- Navigate to Local Traffic > Pools
- Choose “Create”
- Name your IPFIX collection pool
- Select New Members using the address of Scrutinizer and a service port of 4739 (the default for IPFIX)
This pool can now be used by an IPFIX log destination, adding another layer of abstraction between the IPFIX collection pool and publisher. Creating this log destination is the next required step.
- Navigate to System > Logs > Configuration > Log Destinations
- Click “Create”
- Name your log destination
- For “Type,” select “IPFIX”
- For “Protocol,” select “IPFIX”
- For “Pool Name,” select the pool created in the previous step
- Select “UDP” for “Transport Profile”
- For “Template Retransmit Interval,” select “60sec”
- “Template Delete Delay” can be left as “default”
- Server SSL Profile is not required, as we are using UDP as transport
Finally, we just need to create an IPFIX publishe abstraction that will allow us to send IPFIX messages from our iRule logic and into the destination log pipeline.
- Navigate to =System > Logs > Configuration > Log Publishers
- Click “Create”
- Name your publisher (this will be referenced in the iRule logic)
- Select your destination log created in the previous step
With the infrastructure in place to export IPFIX, we can now look at applying iRules to our virtual servers to begin looking at traffic. In part two of this blog, we will construct logic using TCL to attach to network events and start building IPFIX records. In the meantime, check out Scrutinizer if you haven’t already. Scrutinizer is a high-performance Netflow/IPFIX collector that will be able to collect flow information as fast as our load balancers can produce it.


