Today I want to take a look at the Gigamon appliance and their IPFIX configuration. Recently I was asked an interesting question: an avid user of Scrutinizer had a very specific element he wanted to collect and monitor. He wanted to trend what SSL version his internal servers are currently running, as well as the most common version his users come across in the wild. Now, immediately my mind jumped to decryption or deep packet inspection. I knew that with a bit of work we could accomplish this using our FlowPro, which already does DPI. But wait, is there a simpler way?
Luckily Gigamon and their latest round IPFIX exports offers the solution! Gigamon, among other elements, is now exporting SSL information with their metadata exports. In this blog I’ll be walking through our recommended IPFIX configuration.
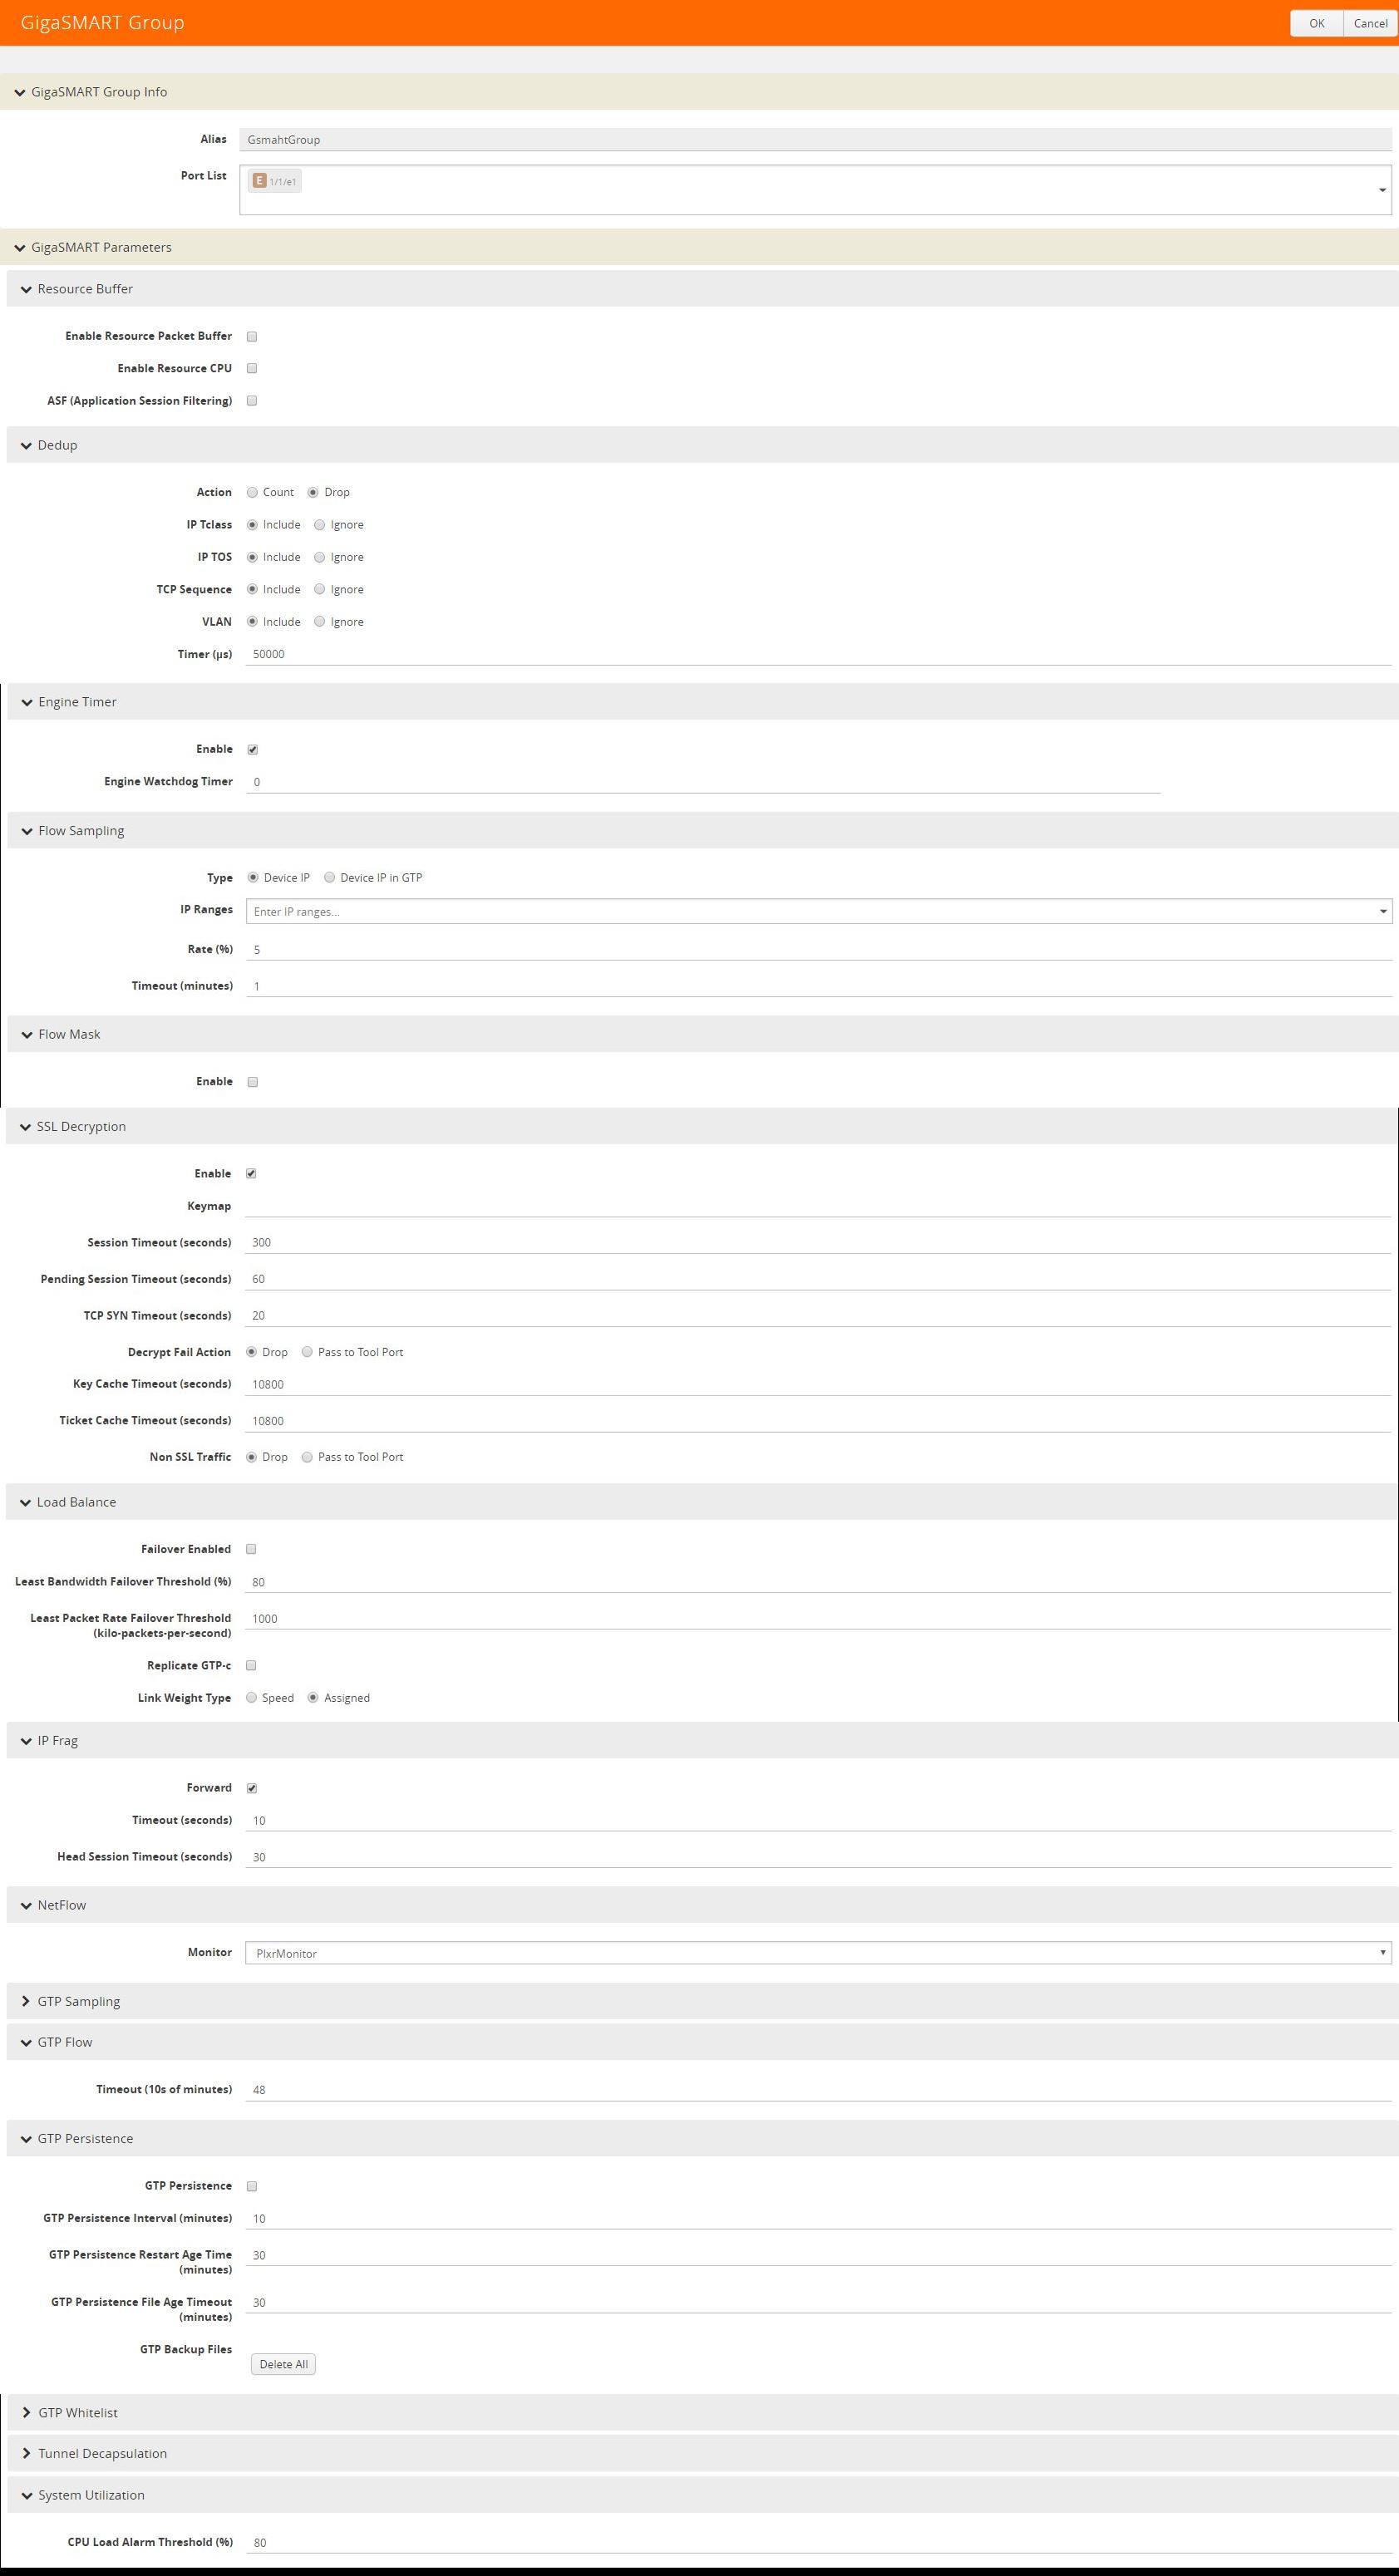
GigaSMART Group
In creating our GigaSMART Group, we’re assigning parameters for NetFlow generation. I’ve created my GigaSMART Group for NetFlow and de-duplication. With de-duplication you can set parameter such as counting the de-dupes versus dropping them, which elements are included in de-duping (for instance should I look at the headers and include the TCP class, ToS or the TCP sequence number. Once we have our parameters for NetFlow and de-duplication set, we’ll provide a port list and later come back to assign our NetFlow Monitor.
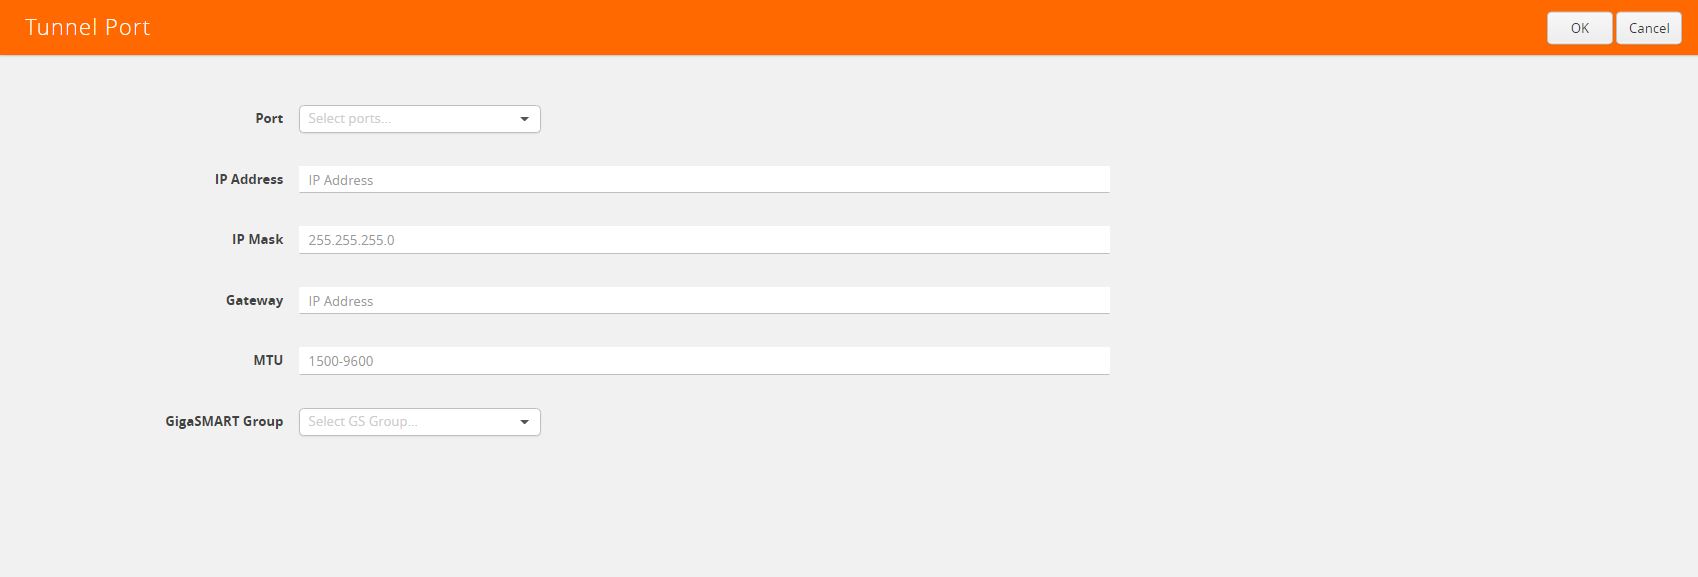
Tunnel Port
Next we’ll create our tunnel port, this is the interface flow data will be exported from. Here we’ll want to configure the following:
- Assign a port
- Configure an IP address
- Configure netmask
- Configure a gateway (This needs to be the IP of our collector)
- MTU (1500 is recommended)
- Tie in the new GigaSMART Group
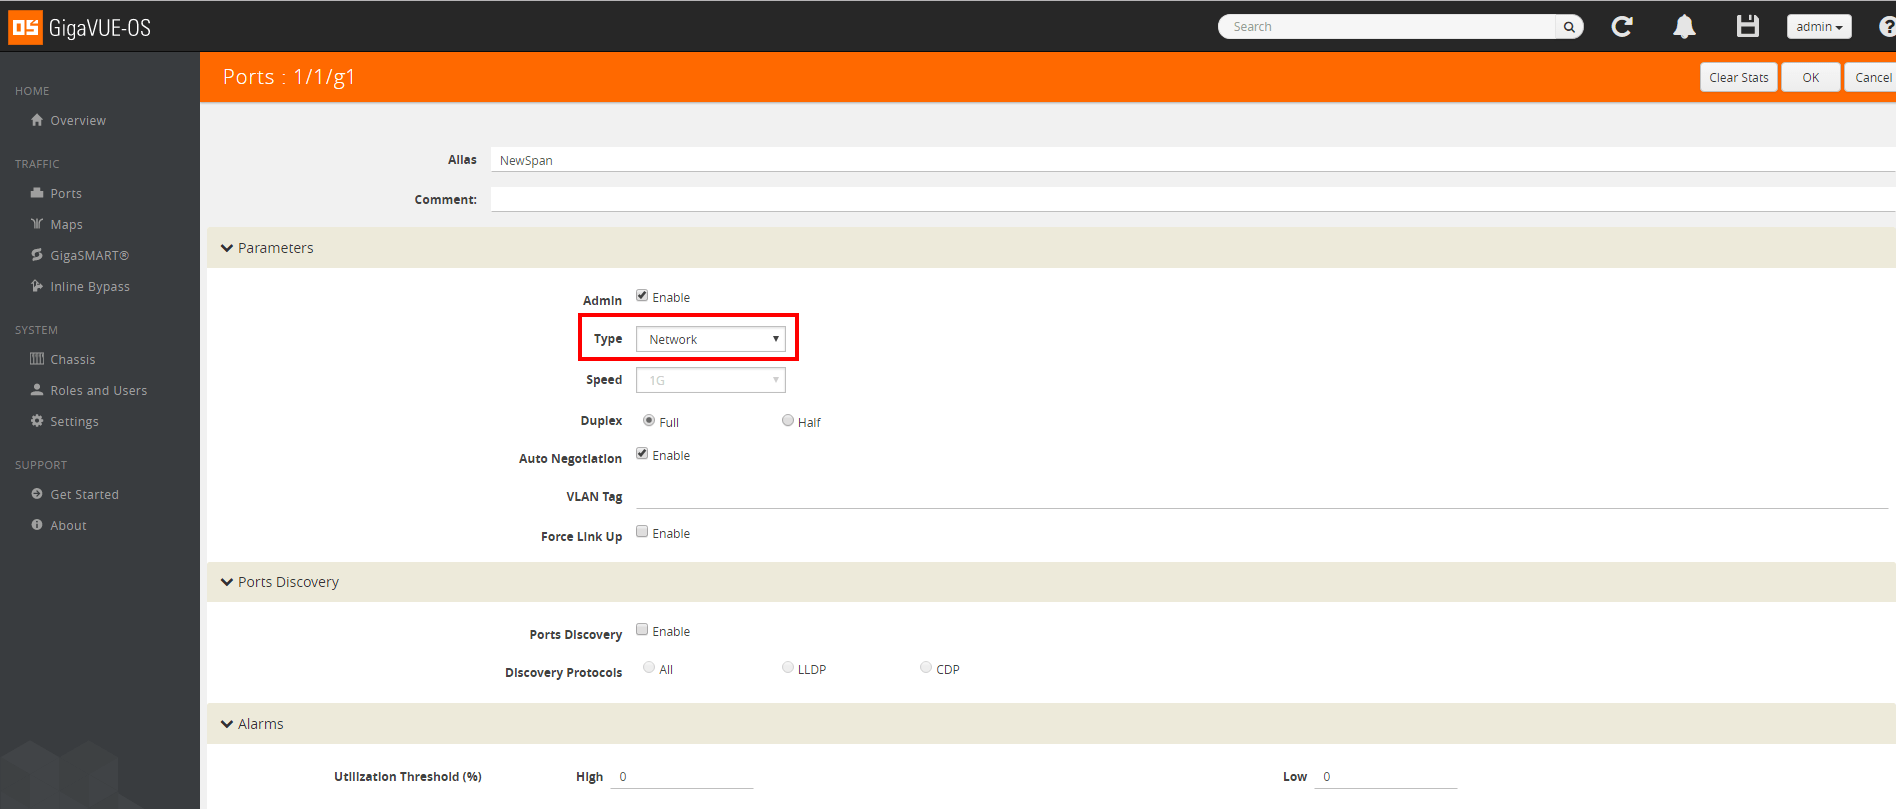
Network Port
Once the tunnel port is configured, we’ll need to configure our span port – the port receiving traffic. Here we’ll just need to configure a specific interface to be:
- Enabled: Yes
- Type: Network
- Speed: 1G default
- Duplex: Full
- Auto Negotiate: Yes
GigaSMART Operations
The next step in configuration will be to set up our GigaSMART Operation. In this view we’ll simply enable NetFlow and de-duplication.

Flow Record
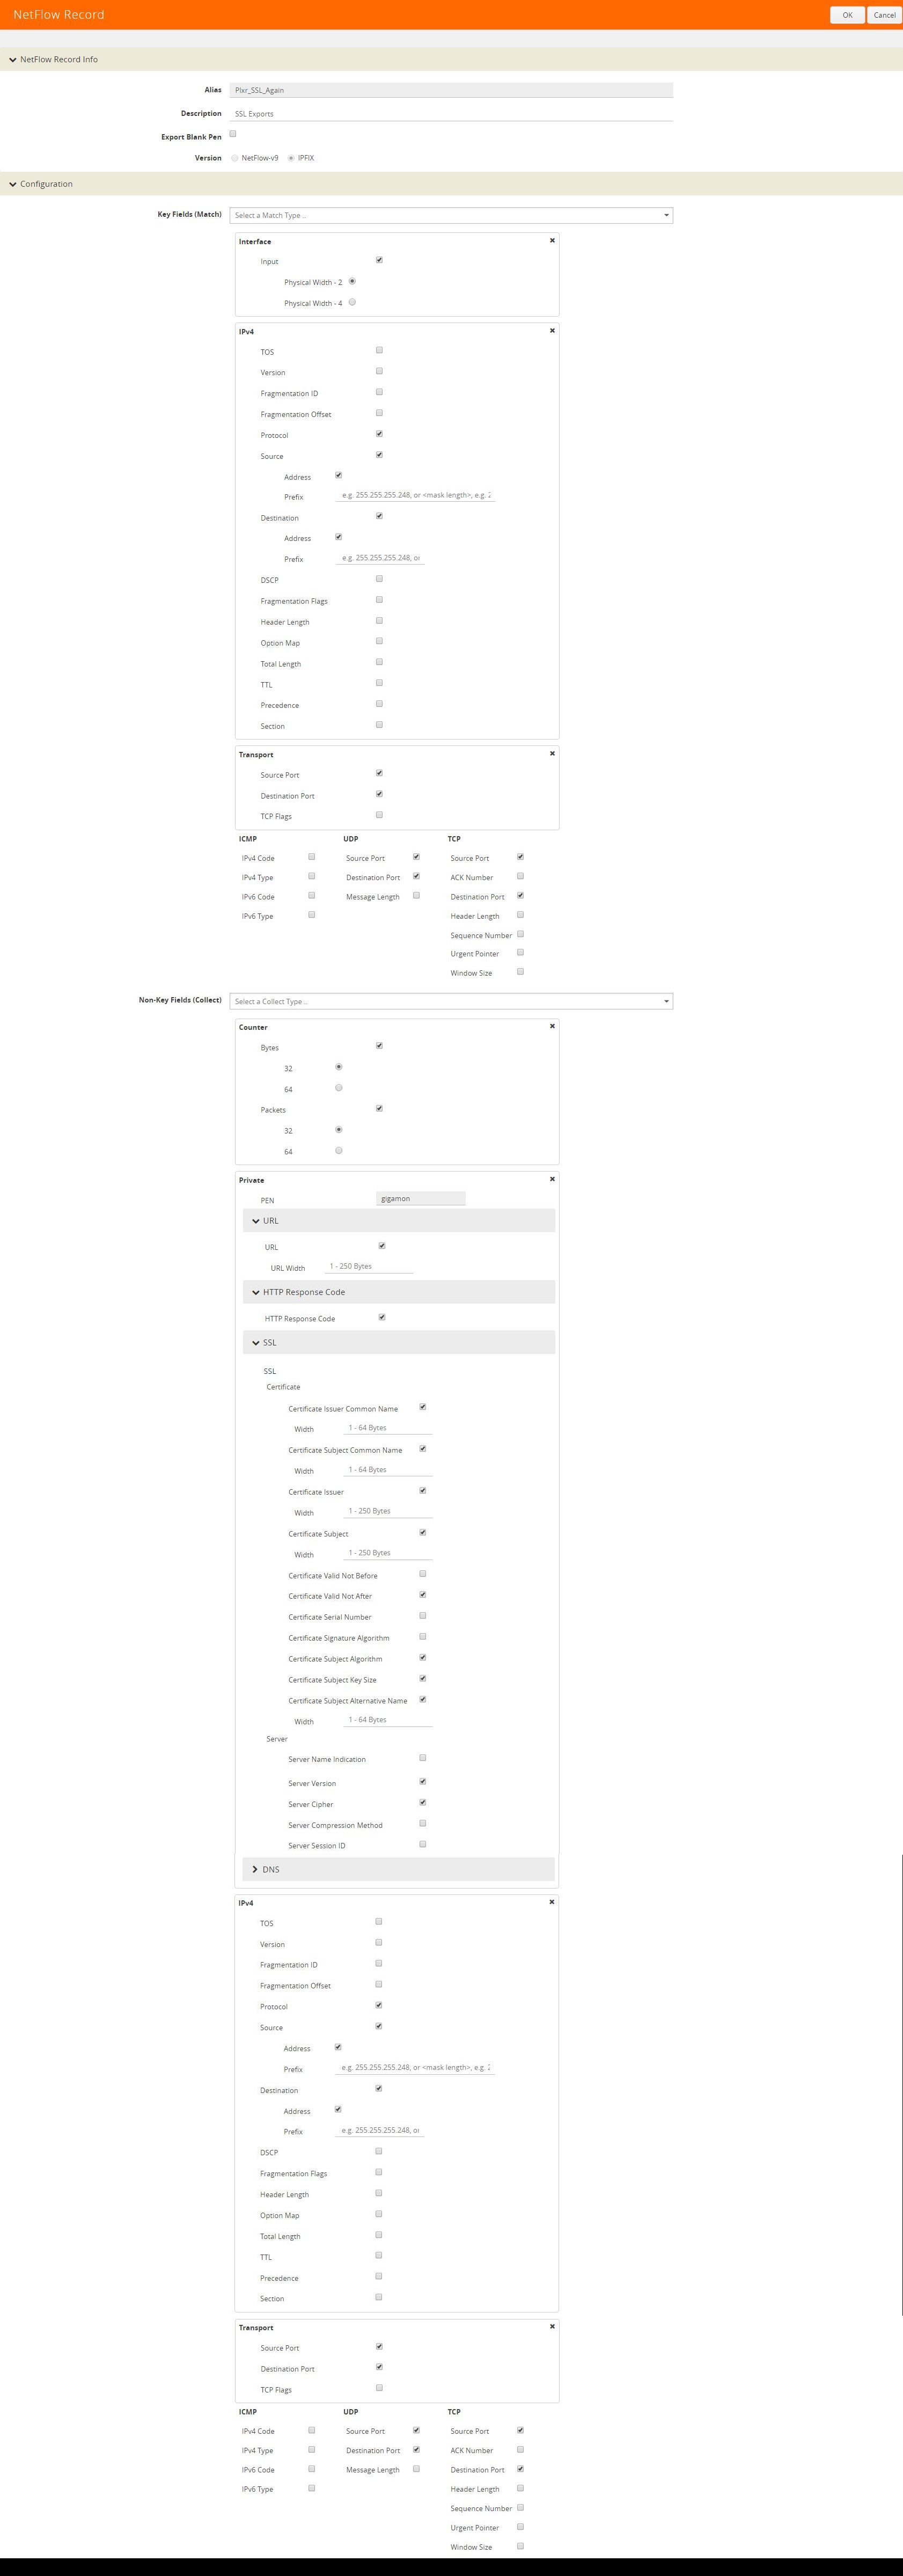
With the GigaSMART Group, GSOP, and ports configured, it’s time to move into the nuts and bolts and create our flow record. Within Gigamon appliances, we are allowed up to 5 records per monitor. This allows us to create separate records by traffic type. It’s important to note that, unlike to traditional NetFlow configurations, match statements do not act as collect statements in our records.
The recommended configuration for in-depth flow and metadata collection and analysis includes two separate records:
Traditional IPFIX:
- MATCH:
- Interface
- Interface Input
- IPv4
- IPv4 Protocol
- Src address
- Dst address
- Transport
- Dst Port
- Src Port
- TCP src/dst port
- UDP src/dst port
- Interface
- COLLECT:
- Counter
- Bytes – 32
- Packets – 32
- Timestamp
- Sys-Uptime First
- Sys-Uptime Last
- Flow-Start Seconds
- Flow-End Seconds
- Flow-Start Milliseconds
- Flow-End Milliseconds
- Data Link
- Source MAC
- Destination MAC
- VLAN
- Interface
- Input
- Output
- IPv4
- ToS
- Protocol
- Source Address
- Destination Address
- Transport
- Source Port
- Destination Port
- TCP Flags
- ACK
- CWR
- ECE
- FIN
- PSH
- RST
- SYN
- URG
- UDP Source/Destination Port
- TCP Source/Destination Port
- TCP Sequence Number
- Counter
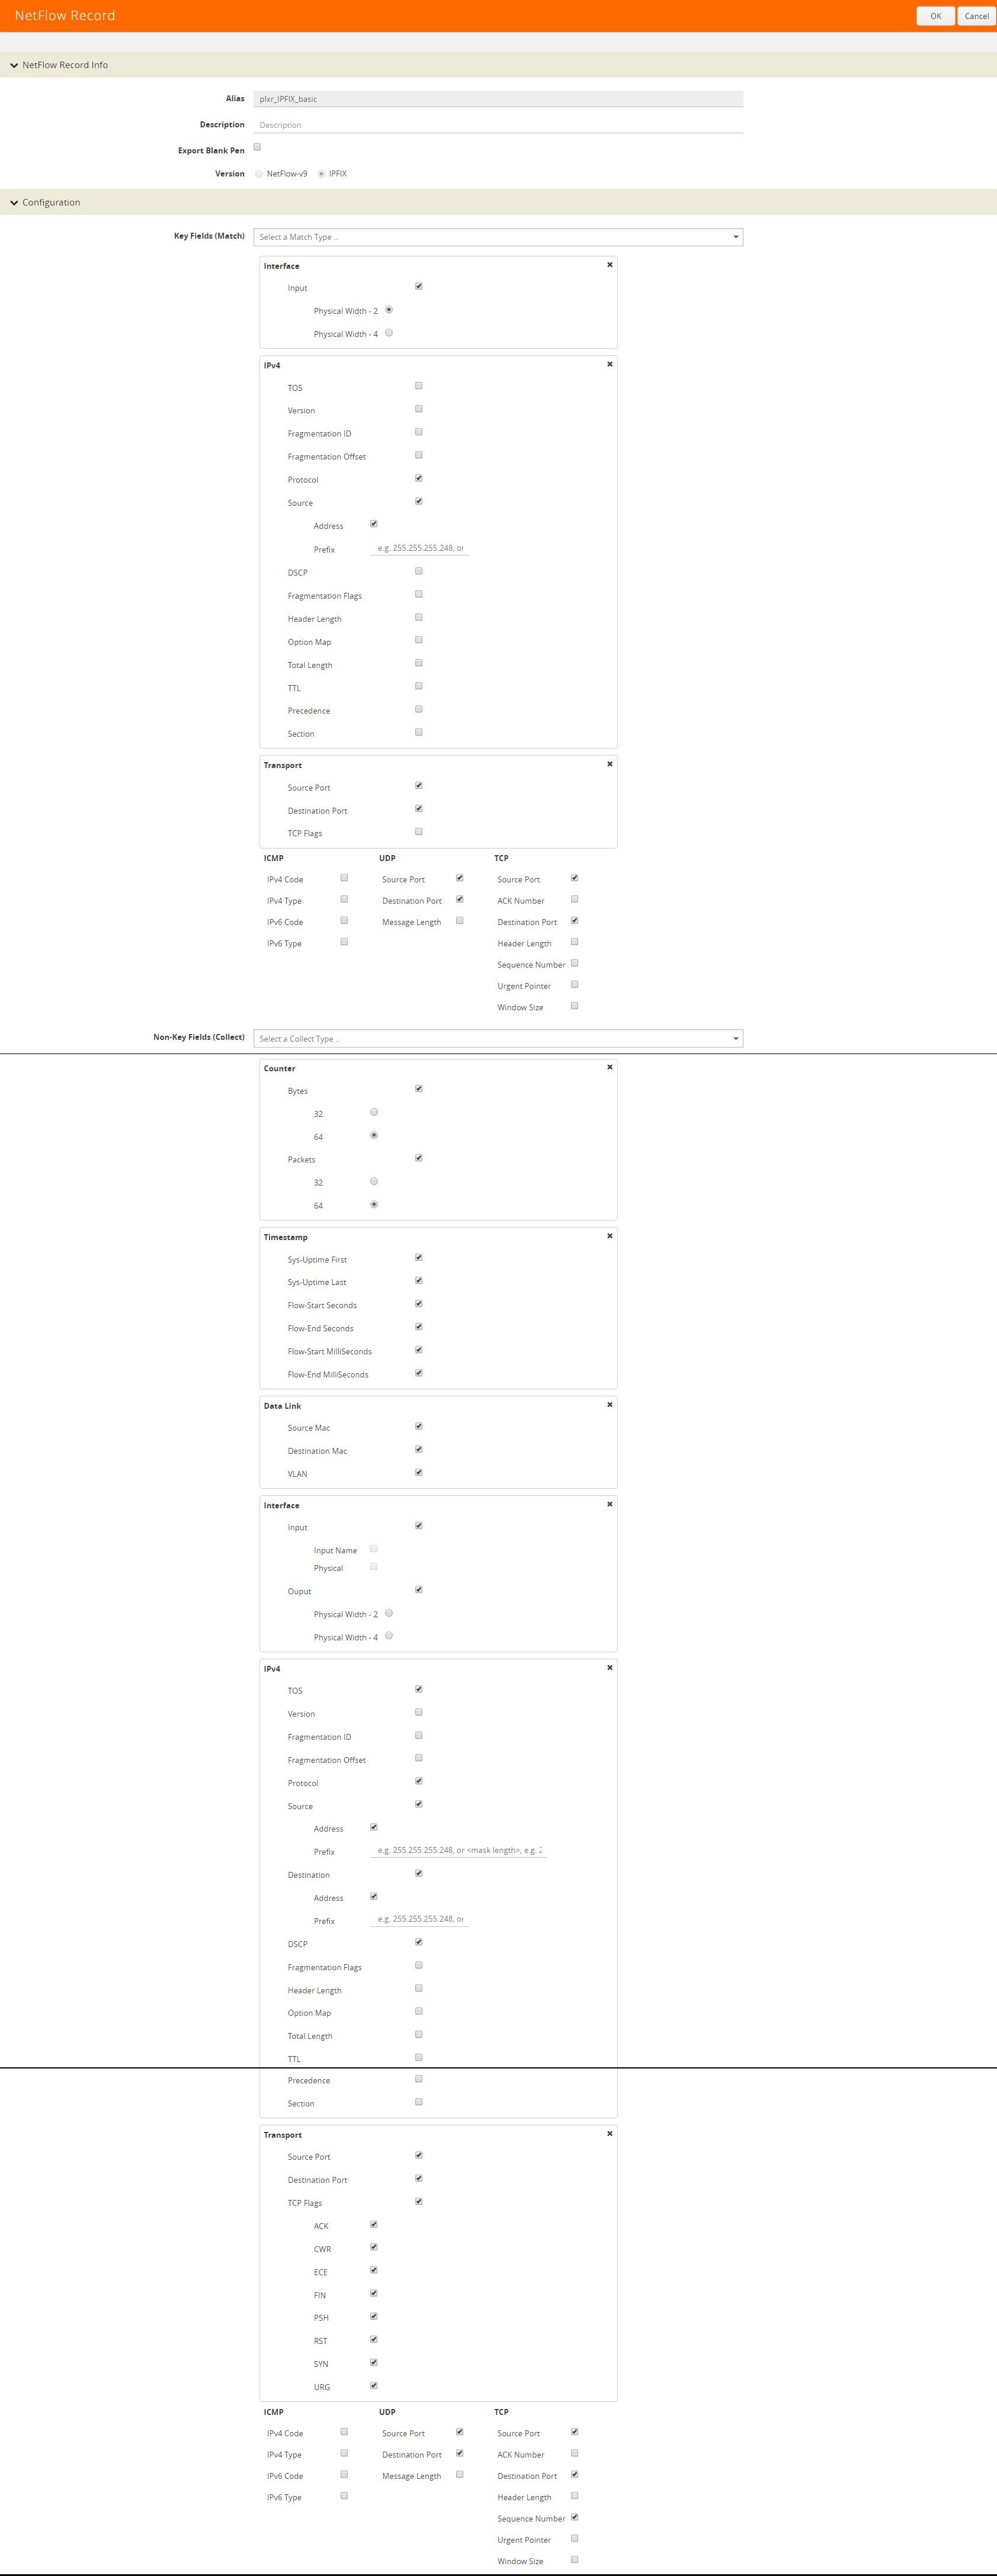
SSL Record:
- MATCH:
- Interface
- Interface Input
- IPv4
- IPv4 Protocol
- Src address
- Dst address
- Transport
- Dst Port
- Src Port
- TCP src/dst port
- UDP src/dst port
- Interface
- COLLECT:
- Counter
- Bytes – 32
- Packets – 32
- Private
- URL
- HTTP Response Code
- Certificate Issuer Common Name
- Certificate Subject Common Name
- Certificate Issuer
- Certificate Subject
- Certificate Valid Not After
- Certificate Subject Algorithm
- Certificate Subject Key Size
- Server Version
- Server Cipher
- IPv4
- Protocol
- Source Address
- Destination Address
- Counter
Exporter
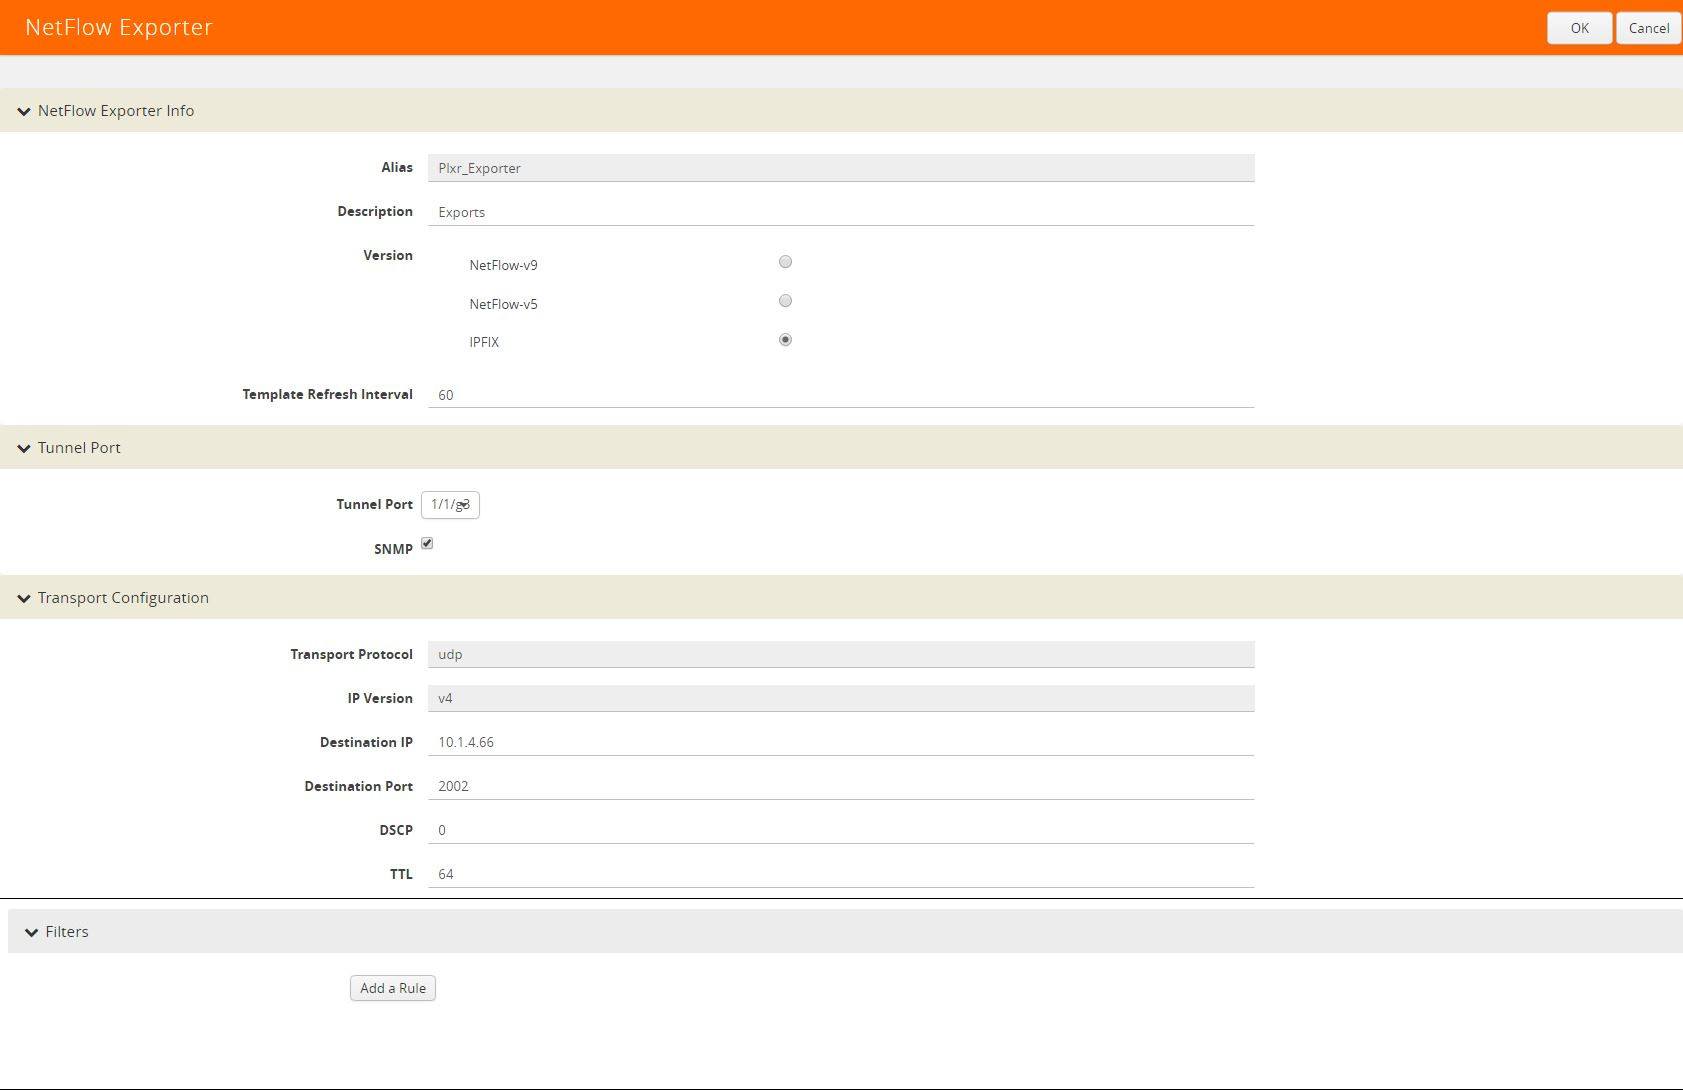
With our records defined, we’ll need to configure our flow exporter. The exporter is pretty straightforward: we’ll want to give it an alias, specify the version of flow exports (in this case IPFIX), specify the template refresh interval (I have mine set to 60), assign our tunnel port configured earlier, and finally, set the transport configuration. The transport configuration is where we’ll want to specify the destination IP, the destination port, transport protocol, etc. Now in my example I’m using port 2002 as I’m sending the flow data to a UDP replicator before our NetFlow collector. If you’re sending straight to a collector you’ll want to use one of the pre-defined listening ports such as 2055,2056,9995,9996, etc.
Monitor
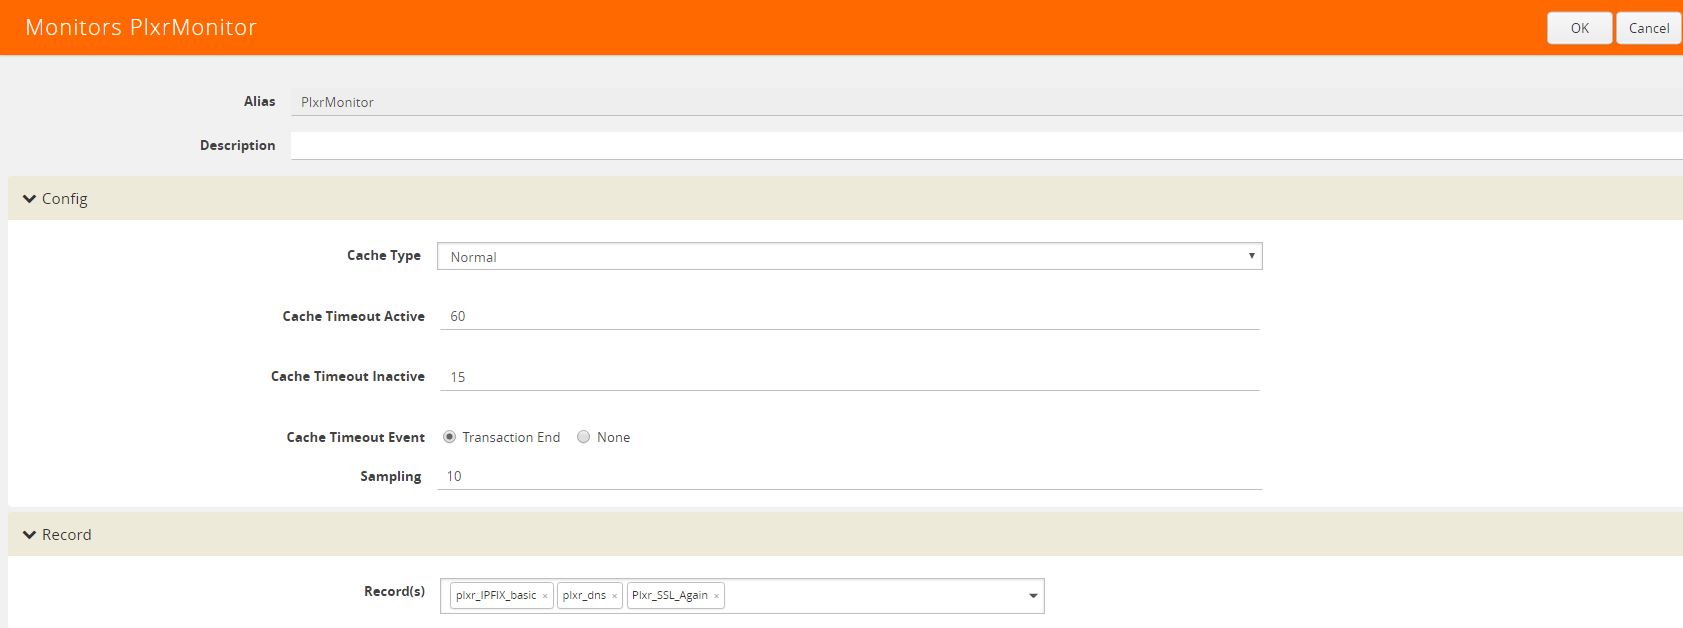
This is where we’ll specify our timeout rates and tie in our record(s). I recommend setting the active timeout to 60 as we’ll want to be receiving 1-minute updates even if the conversation is still alive. The following is the best recommended configuration:
- Cache Type: Normal
- Cache Timeout Active: 60
- Cache Timeout Inactive: 15
- Cache Timeout Event: Transaction End
- Sampling: 1000
- Records: Apply your records here
- The sampling rate here can be adjusted, but a recommended 1:1000 is a good place to start.
Port Map
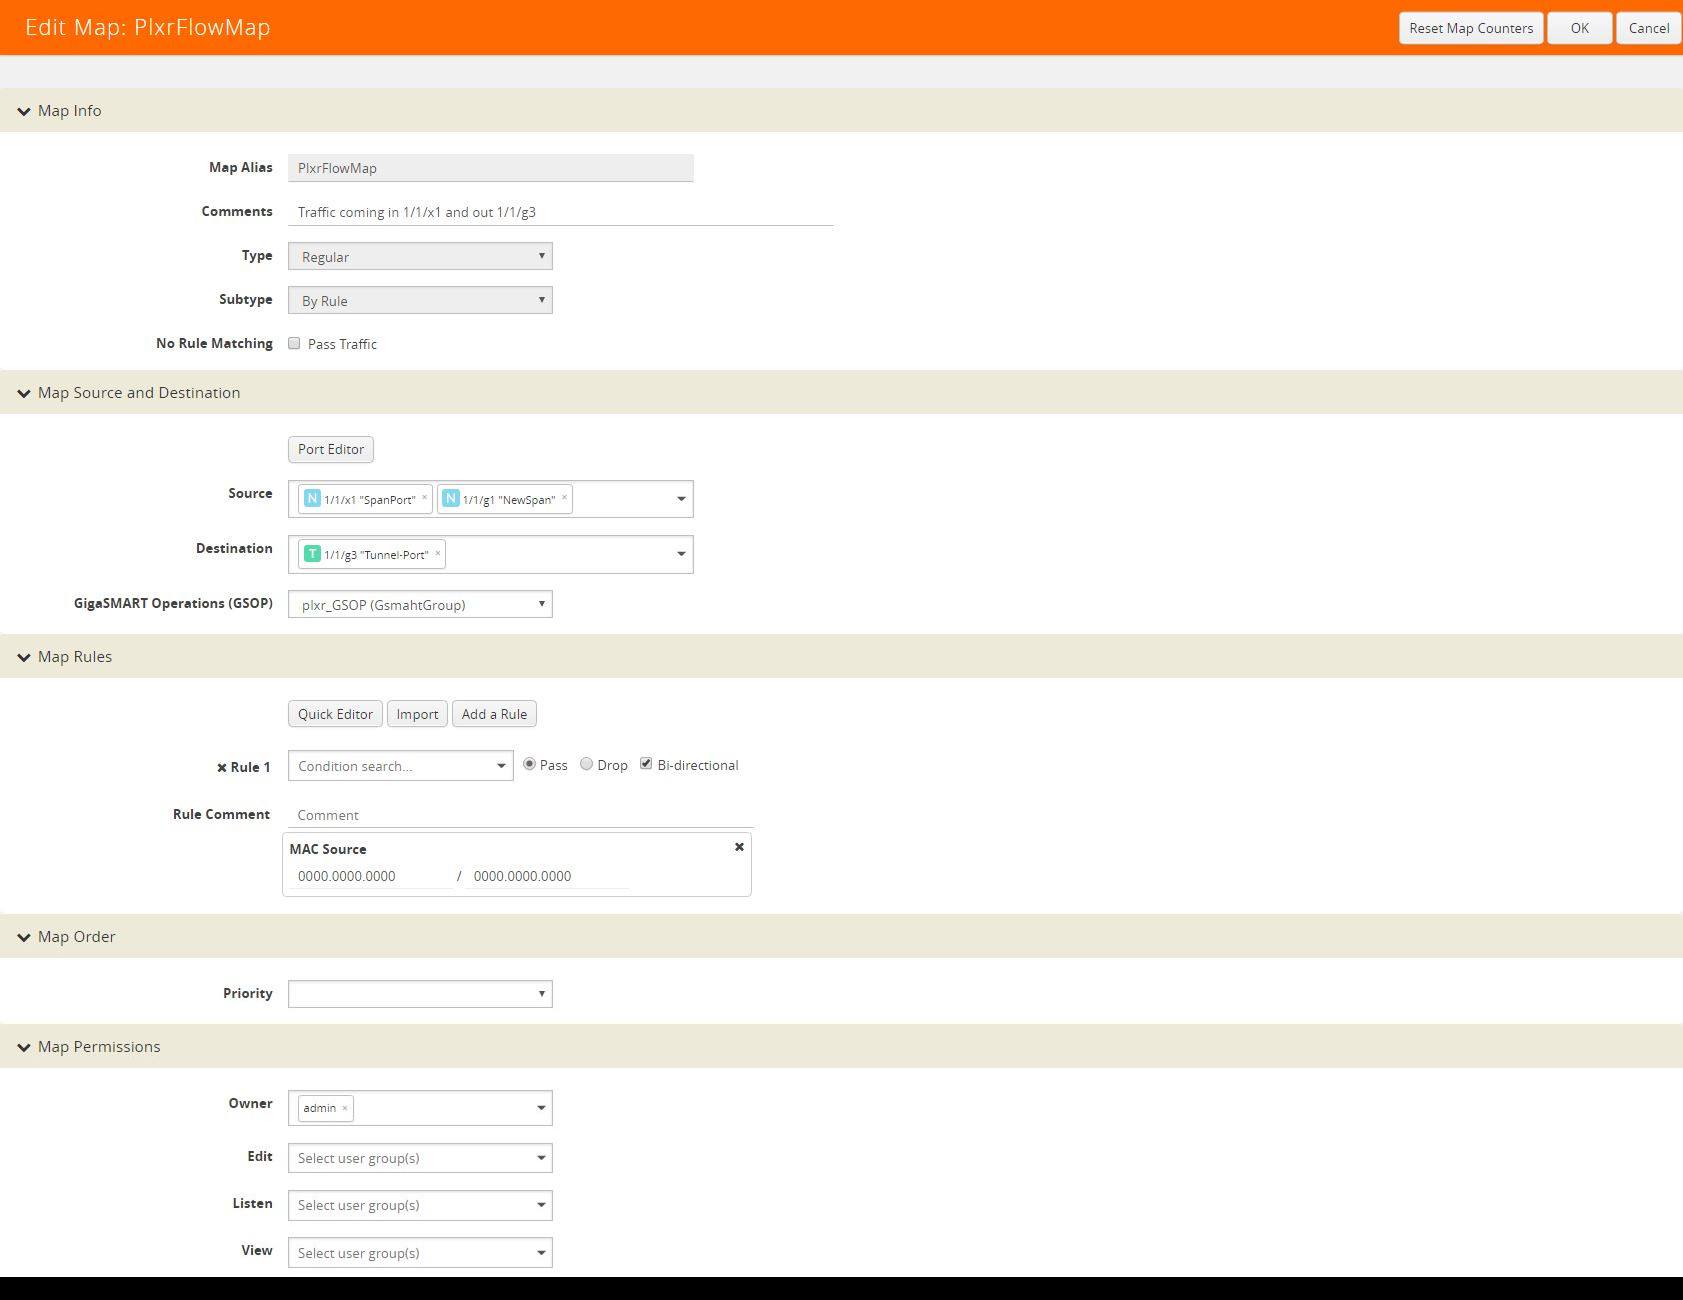
With all of our metadata generation in place, we’ll need to go and configure our port map. This coordinated both our network and tunnel interfaces:
- Source Ports: Specify your network port
- Destination Port: Specify your tunnel port
- Map Rules: I’ve configured my map rules to allow any MAC address as a source
- / 0000.0000.0000 (ANY)
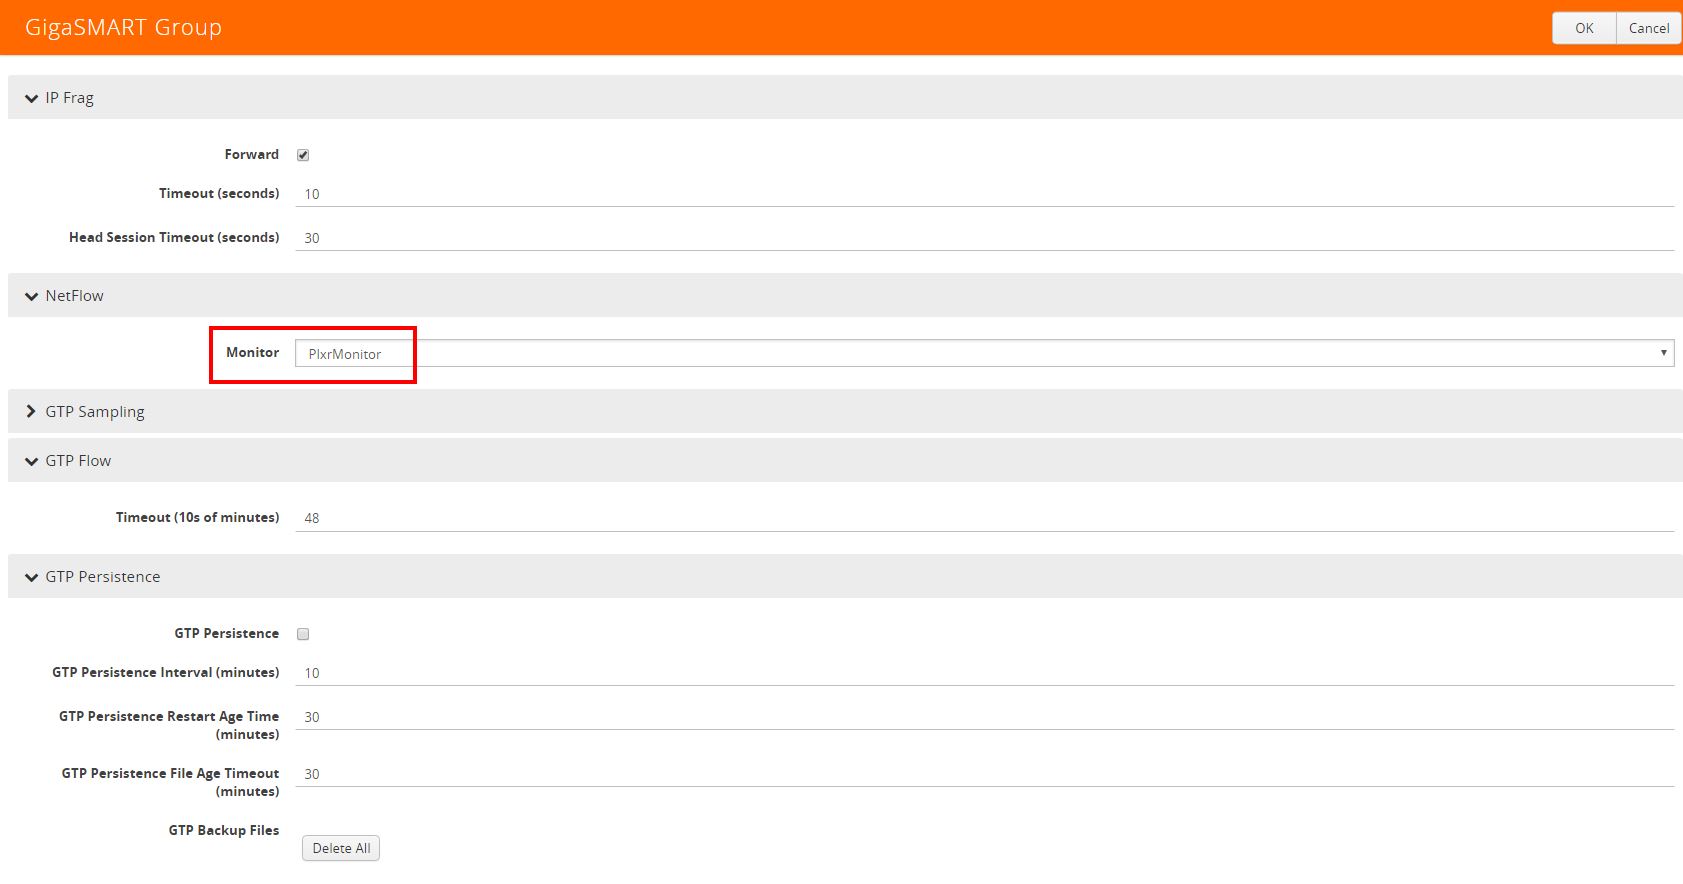
Associate Monitor to GigaSMART Group
The final step in our metadata configuration is to apply our flow monitor to our GigaSMART Group.
Congratulations! Now you have some awesome IPFIX data coming from your Gigamon appliance! Last, but not least, we’ll want to use our favorite NetFlow Collector to analyze this traffic. Be sure to check back as our configuration will update to include ALL of Gigamon’s unique metadata elements!
For more information on Gigamon’s IPFIX exports take a look at their documentation here.


