 A little while ago we posted an article on F5 IPFIX Support. I wanted to follow up on that and dig a little deeper on how to configure your F5 to send IPFIX and IEs to a collector. Remember, IEs are individual fields in an IPFIX template. Under the F5 an IPFIX template describes a single Advanced Firewall Manager (AFM) event.
On top of that, it looks like F5 has also extend their IPFIX support and have added quite a few of new information elements or IEs. Make sure to check them out.

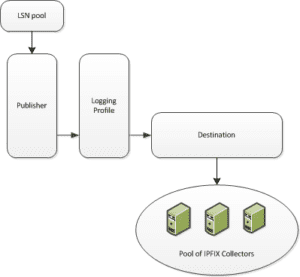
Here is an over view of how to enable F5 IPFIX support on the BIG-IP system. The process involves creating and connecting the following configuration objects.
- Pool of IPFIX collectors – Here is where you create a pool of IPFIX collectors to which the BIG-IP system can send IPFIX log messages.
- Destination – here is where you create a log destination to format the logs in IPFIX templates, and forward the logs to the IPFIX collectors.
- Publisher – Here is where you create a log publisher to send logs to a set of specified log destinations.
- LSN pool – Here is where you associate an LSN pool with a logging profile and log publisher in order to log messages about the traffic that uses the pool.
How to configure F5 IPFIX Support
STEP 1: Creating a pool of IPFIX collectors
To start you need to configure the BIG-P system to send the IPFIX logs of your CGNAT mappings to your IPFIX collector.
- On the Main tab, click .
- Click Create.
- In the Name field, type a unique name for the pool.
- Using the New Members setting, add the IP address for each IPFIX collector that you want to include in the pool:
- Type the collector’s IP address in the Address field, or select a node address from the Node List.
- Type a port number in the Service Port field.
By default, IPFIX collectors listen on UDP or TCP port 4739 and Netflow V9 devices listen on port 2055, though the port is configurable at each collector.
- Click Add.
- Click Finished.
Step 2: Creating an IPFIX log destination
A log destination of the IPFIX type specifies that log messages are sent to your IPFIX collector.
- On the Main tab, click .
- Click Create.
- In the Name field, type a unique, identifiable name for this destination.
- From the Type list, select IPFIX.
- From the Protocol list, select IPFIX or NetFlow V9, depending on the type of collectors you have in the pool.
- From the Pool Name list, select an LTM® pool of IPFIX collectors.
- From the Transport Profile list, select TCP, UDP, or any customized profile derived from TCP or UDP.
- Type the Template Retransmit Interval, the time between transmissions of IPFIX templates to the pool of collectors.
- The Template Delete Delay is the time that the BIG-IP device should pause between deleting an obsolete template and using its template ID. This feature is not currently implemented.
- Click Finished.
Step 3 :Creating a publisher
- On the Main tab, click .
- Click Create.
- In the Name field, type a unique, identifiable name for this publisher.
- Use the Log Destinations area to select an existing IPFIX destination (perhaps along with other destinations for your logs): click any destination name in the Available list, and click << to move it to the Selected list.
- Click Finished.
Step 4: Configuring an LSN pool
You can associate an LSN pool with a log publisher and logging profile that the BIG-IP® system uses to send log messages to a specified destination.
- On the Main tab, click .
- Select an LSN pool from the list. The configuration screen for the pool opens.
- From the Log Publisher list, select the log publisher the BIG-IP system uses to send log messages to a specified destination.
Important: If you configure a log publisher to use multiple logging destinations, then, by default, all logging destinations must be available in order to log to each destination. Unless all logging destinations are available, no logging can occur. If you want to log to the available logging destinations when one or more destinations become unavailable, you must set the logpublisher.atomic db variable to false.
- Optional: From the Logging Profile list, select the logging profile the BIG-IP system uses to configure logging options for various LSN events.
- Click Finished.

The complete set of instructions for F5 IPFIX Support, including how to configuring an LTM virtual server for Network Firewall event logging via IPFIX, is located on the F5 IPFIX config page.
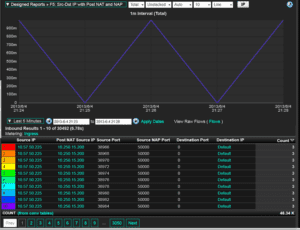
Now that you have IPFIX setup and sending flow Scrutinizer will automatically pick up on the data and start reporting on it. You can also design you own report templates with Scrutinizer’s report designer. If you are interested in learning more about the F5 IPFIX reporting or need any help setting it up please give us a call.
 A little while ago we posted an article on F5 IPFIX Support. I wanted to follow up on that and dig a little deeper on how to configure your F5 to send IPFIX and IEs to a collector. Remember, IEs are individual fields in an IPFIX template. Under the F5 an IPFIX template describes a single Advanced Firewall Manager (AFM) event.


