With the ever-growing support for flow exports, the need for probes and port mirroring has become a lot more limited. There are certain environments where it’s a requirement, however, and physically impossible to position a probe near a device that we want to port mirror from. In these situations, it’s important for the probe to have support for a remote span.
Today I’ll walk through how to configure an ERPSAN within VMware and Cisco switches.
Configuring ERSPAN within VMware
- Start by logging in to the vSphere Web Client and selecting the virtual distributed switch you want to monitor traffic from
- Select the Manage tab, then select Settings
- Select Port Mirroring
- Select New to create a port mirroring session to mirror VDS traffic to specific physical switch ports
- In the ‘select session type’ section, choose Encapsulated Remote Mirroring (L3) Source then select Next
- Under the Edit Properties section, assign a name, description and session details for the new port mirroring session.
- Select Enabled from the status dropdown list and the click Next
- In the ‘select sources’ section, select existing ports or create new source ports and click Next
- In the ‘select destinations’ section, click the green (+) sign to add the IP address(es) that should receive traffic
- In the ‘ready to complete’ section, verify the information and click Finish
Configuring ERSPAN within Cisco Devices
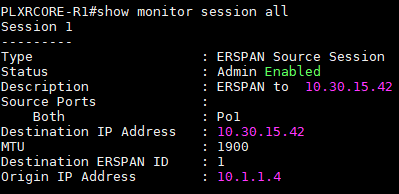
Create an ERSPAN source session:
- Enable
- Conf t
- Interface interface-type interface-number
- Plim Ethernet vlan filter disable
- Monitor session span-session-number type erspan-source
- Description string
- [no] header-type 3
- Source interface interface-name interface-number
- Source vlan {id-single | id-list | id-range | id-mixed} [rx | tx | both]
- Filter vlan {id-single | id-list | id-range | id-mixed}
- Filter access-group acl-filter
- Destination\
- Erspan-id erspan-flow-id
- Ip address ip-address
- Ip prec prec-value
- Ip dscp dscp-value
- Ip ttl ttl-value
- Mtu mtu-size
- Origin ip address ip-address [force]
- Vrf vrf-id
- No shutdown
- End
Create an ERSPAN Destination Session
- Enable
- Conf t
- monitor session session-number type erspan-destination
- description string
- destination interface {gigabitethernet | port-channel} [interface-number]
- source
- erspan-id erspan-flow-id
- ip address ip-address [force]
- vrf vrf-id
- no shutdown

Plixer FlowPro Series
So far, we’ve touched on the need in some environments for a probe, as well the ability to configure and use an ERSPAN. Fortunately, Plixer’s FlowPro series can natively decrypt GRE traffic sent using ERSPAN!
Plixer offers three different models of the FlowPro (that can be deployed in a single virtual or hardware appliance), the FlowPro APM and FlowPro Defender. The image below shows the capabilities of each model.
[table id=74 /]
As you can see the FlowPro APM is designed to provide Layer 7 visibility and application performance metrics such as latency, packet loss and jitter statements for VoIP traffic. The Defender series, on the other hand, is designed to perform deep packet inspection to pull DNS-specific elements that are then used to monitor for security events like command-and-control communications, data exfiltration, and FQDN (Fully Qualified Domain Name) reporting.
If you’d like to gain deeper insight into your application performance statistics or enhance your existing security infrastructure, don’t hesitate to try a fully supported Scrutinizer evaluation or FlowPro evaluation.