
SNMP, also known as Simple Network Management Protocol, can be a network admin’s best friend. With the ability to pass SNMP information to other devices and monitoring tools, we can easily identify a device instead of having to stop and run an nslookup. A question I’ve received a lot recently is, “how can you configure Meraki devices to send SNMP information to Scrutinizer?” Here’s how!
What Does Scrutinizer Do with SNMP?
Once a device starts sending flows to Scrutinizer, we can display the IP address and interface instance numbers and then begin showing utilization per interface. After Scrutinizer gets SNMP information from the device, we’ll see the interface name instead of something like “Instance 8675309.”. Not only that, but now we’ll be able to see the configured device name as well as utilization in percentages since we can now get the interface speed.
How is This Helpful?
As I said above, once we get the  device name instead of the IP address in Scrutinizer, we don’t have to run an nslookup for every single device. If you have very few devices sending to your flow collector, it wouldn’t be a huge deal. But once your device count starts to climb, it’s hard to keep track.
In addition, now we can get an interface name. Sure, that’s nicer to look at than an instance number, but the big benefit here is that now you can see where your traffic is coming from and going to. You can also see how saturated each link is without having to log on to the device itself and search for the interface number. Lastly, getting an interface speed gives you the ability to see the percentage of utilization per interface right from the Status tab.
How to Configure Meraki
And now, here’s how we can set up Meraki for SNMP Polling. First, log on to your Meraki device webui. Next, navigate to organization > settings > SNMP.
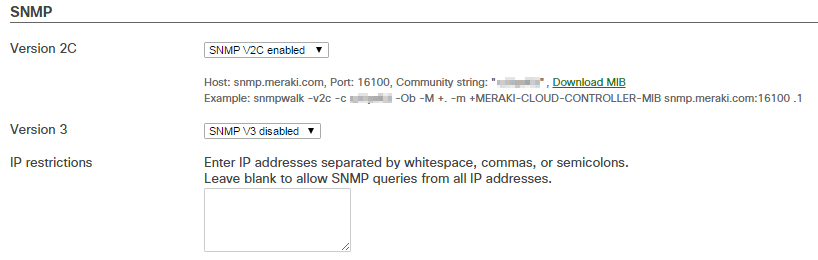
This is where you can choose what type of SNMP you want to configure. SNMPv2 is the standard; when it comes to security, however, that is SNMPv3’s priority. SNMPv3 will require a user and password to access the information, whereas SNMPv1 and 2 only need a community string and the IP address on the access list for the device. I won’t get into the particulars here, but you can learn more about the different types of SNMP here.
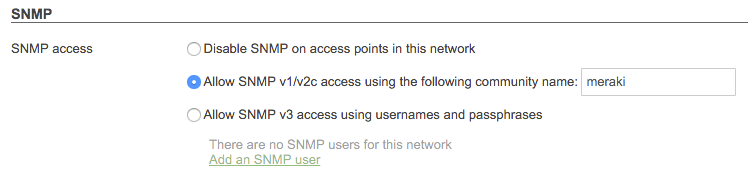
Once you choose the type of SNMP you’d like enabled, go to Network-wide > General > SNMP. This is where you choose which community will be used for SNMPv2 or what credentials you’ll need for SNMPv3.
Now you have your device set up for SNMP. Hooray! Let’s move on to Scrutinizer.
Setting up Scrutinizer
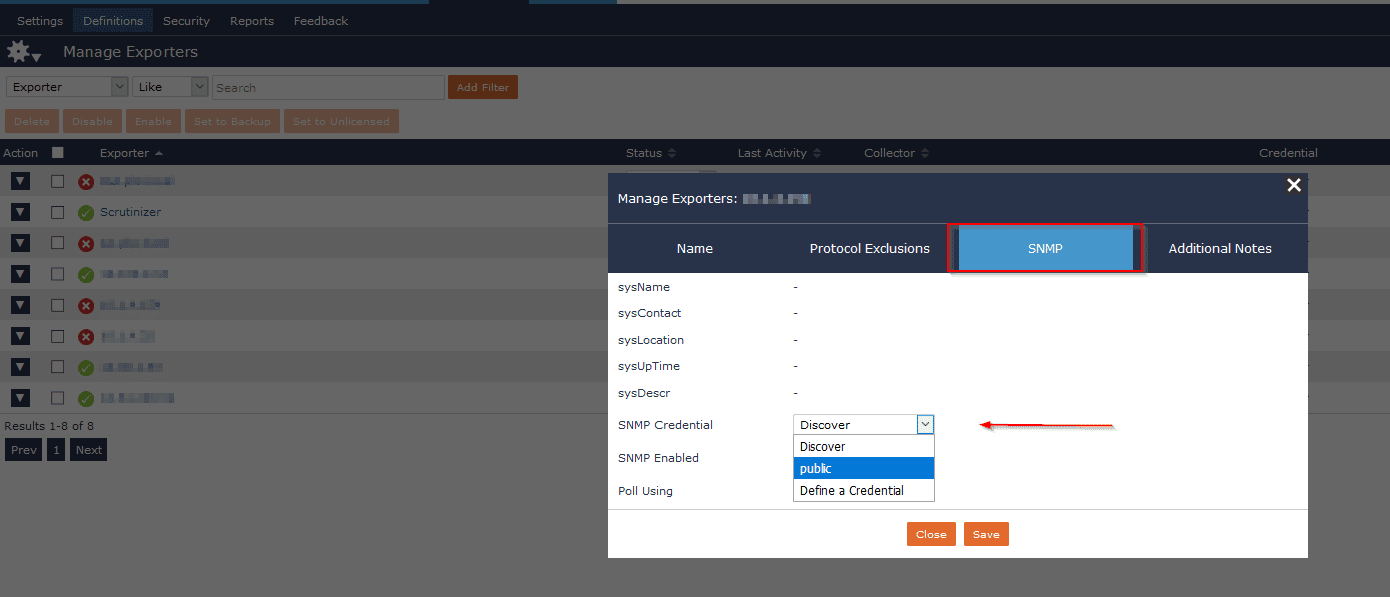
Setting up the SNMP settings in Scrutinizer is quite simple. Log in to your webui and navigate to Admin > Definitions > SNMP Credentials.
Next, select New and create your new community. After you have your community configured, navigate to Admin > Definitions > Manage Exporters. Find your Meraki device on the list, click the IP address, select the SNMP tab, and choose the credentials you just made.
After choosing the profile, select the dropdown arrow to the left of the IP and choose Update SNMP. It may take a moment or two, but once it’s finished you should get green text saying that SNMP was successfully updated. Now you can enjoy your device hostname, interface names, and reports in percentages.
Remember, if you get hung up on something during this process please reach out to us here in support!