Today we are going to talk about Plixer’s new Flow Analytics algorithm, Reverse SSH Shell, which has been included in the latest Plixer Scrutinizer update. The Reverse SSH Shell algorithm identifies possible reverse SSH tunnels to external destinations.
A reverse SSH tunnel allows an external entity access to internal, protected resources via use of an established outbound SSH connection. Reverse SSH tunneling listens on a network port on a local computer. If it detects an SSH request to that port, it relays that connection request back to itself, down the established connection. This provides a new connection from the local computer to the remote computer.
If you have a hard time setting up our instance in your lab or production environment, it may be better to try it within a simple configured network before you go hardcore and verify it in more complex networks that include network address translation or IPsec site-to-site VPN. This will help you to understand a mechanism of Reverse SSH Shell “connection”.
How to test the Reverse SSH Shell algorithm
In my example, I have two different hypothetical networks connected to each other through an IPsec VPN Tunnel.

We’ll establish a reverse SSH shell between ClientHost and Devil. They are located under different networks and may ping each other because of the VPN tunnel, which will be taken off after the initial connection is established.
Before we go ahead, navigate to Scrutinizer > Admin > Settings > Reverse SSH Shell, then verify both L3 devices have been added to the exporters list.

1. SSH from the destination to the source by using a public IP address using the command below:
ssh –R 19999:localhost:22 sourceuser@18.210.158.60
Note: Port 19999 can be any unused port.
2. Now you can SSH from source to destination through SSH tunneling:
ssh localhost –p 19999
Note: The connection between destination and source must be alive at all time.
Now how can we see it and how Scrutinizer can help us with a way to define this violation?
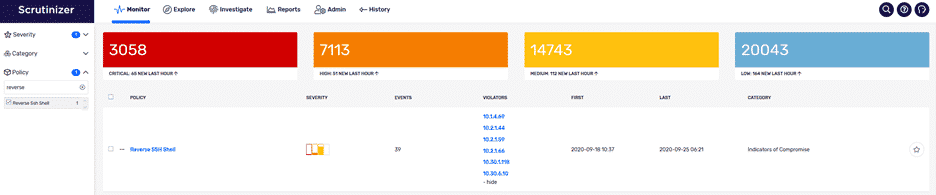
In the screenshot above “10.30.1.118” did appear under the violators list, so let’s take a closer look by clicking on Reverse SSH Shell policy, which will bring up its alarm policy:
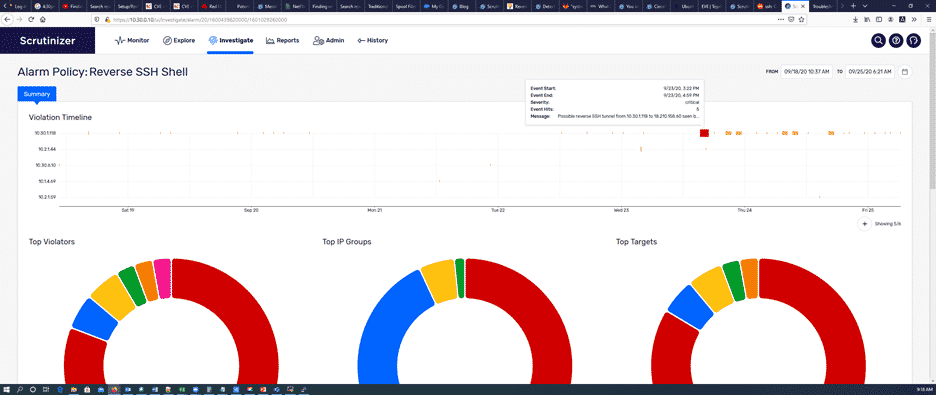
The image above shows when each of those violations happened, and each violation has its own severity level. Further down, we can get a report regarding the connection between the violator and a victim:
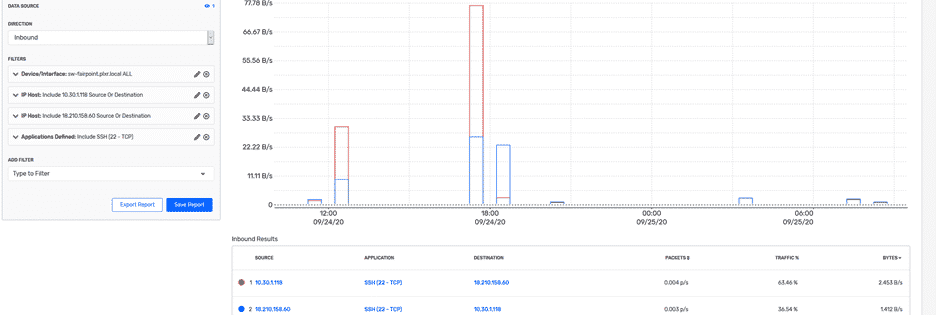
Here we can see the conversation that has happened between the two IP addresses. With the help of Plixer Scrutinizer, we have been able to identify a threat attempt by watching the traffic happened between the two hosts. If you have questions on identifying reverse SSH tunnels in your network, please let us know.